¶ .Net Core Web App 快速开始
本教程讲述在 .Net Core 框架下处理用户登录、检查登录状态、获取用户信息、登出的方式。
环境要求:.Net SDK 3.1,visual studio 2019
¶ 配置 Authing
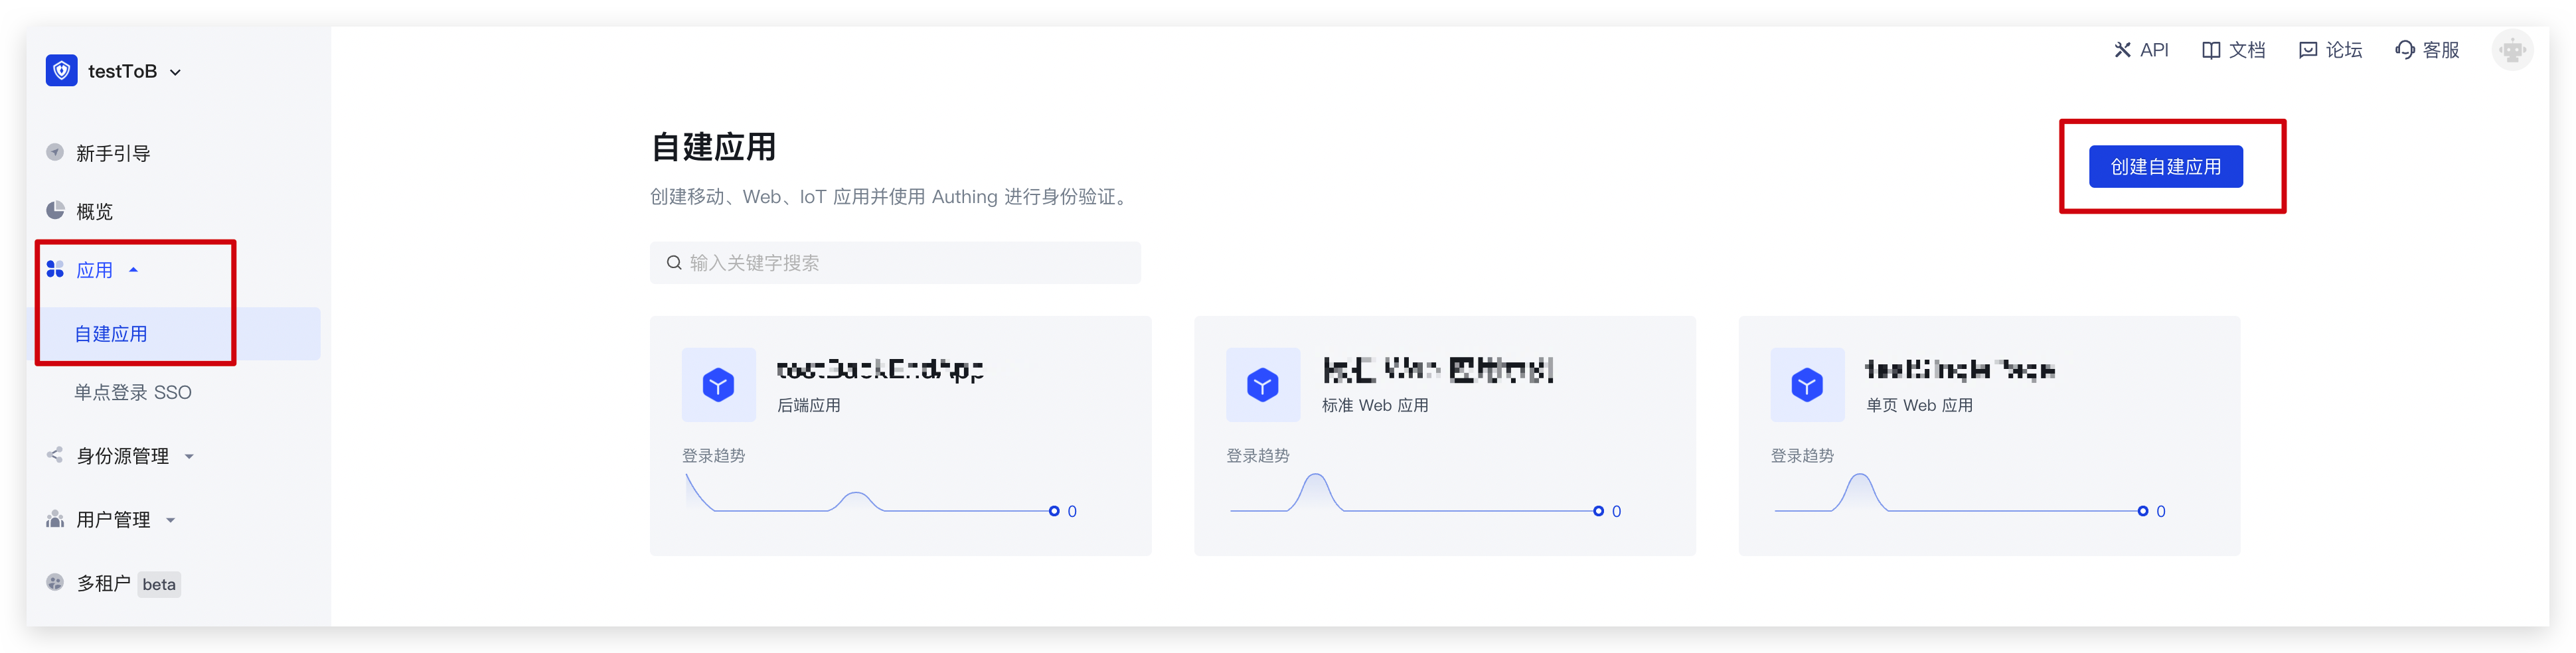
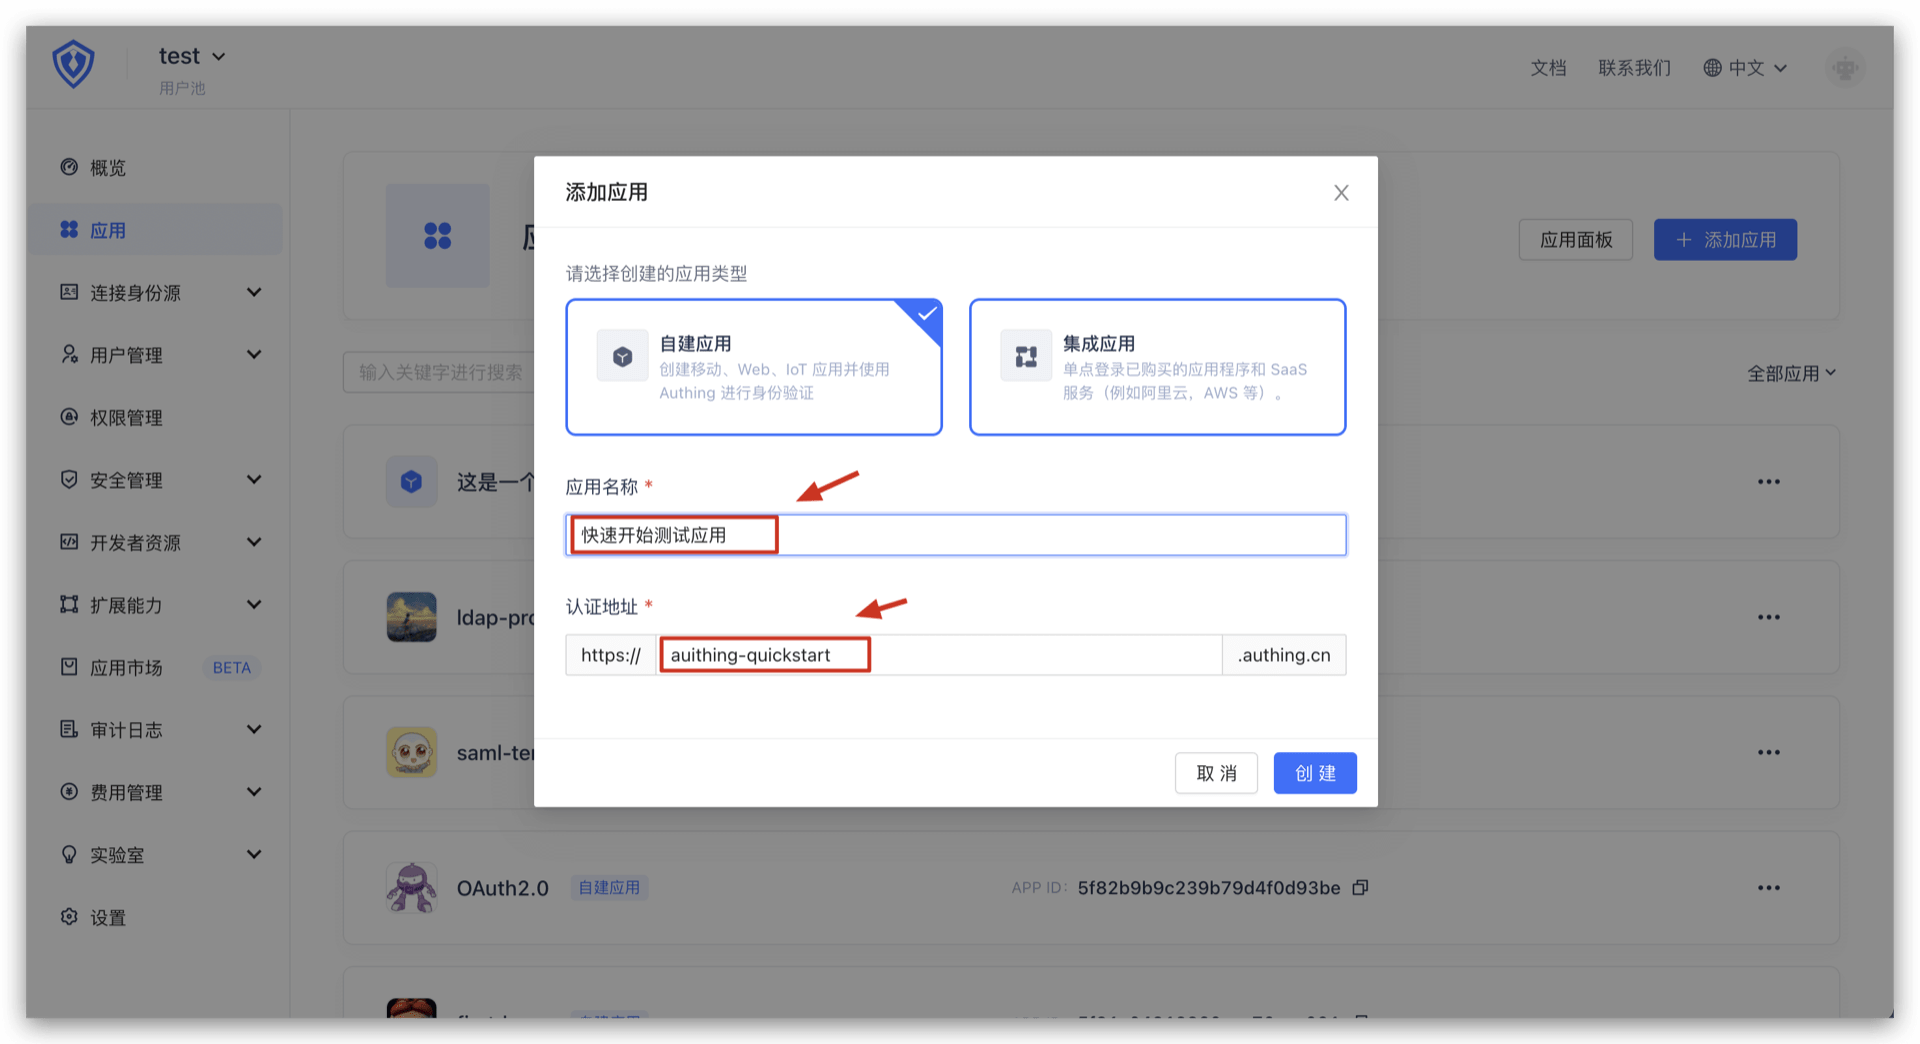
你需要先在 Authing 创建一个应用。进入控制台 (opens new window) > 应用,点击「添加应用」。
认证地址填写一个域名,作为这个应用在 Authing 的唯一标识,这里使用 authing-quickstart 作为示例,回调链接填写:http://localhost:5000/auth/callback
可能你使用不了
authing-quickstart作为自定义域名的一部分,使用其他并不会影响功能,需要注意的是相关配置中不能填写错误。回调地址推荐填写http://localhost:5000/auth/callback,5000是WebApi的默认启动地址,/auth/callback则会在之后创建相关的控制器以及方法。
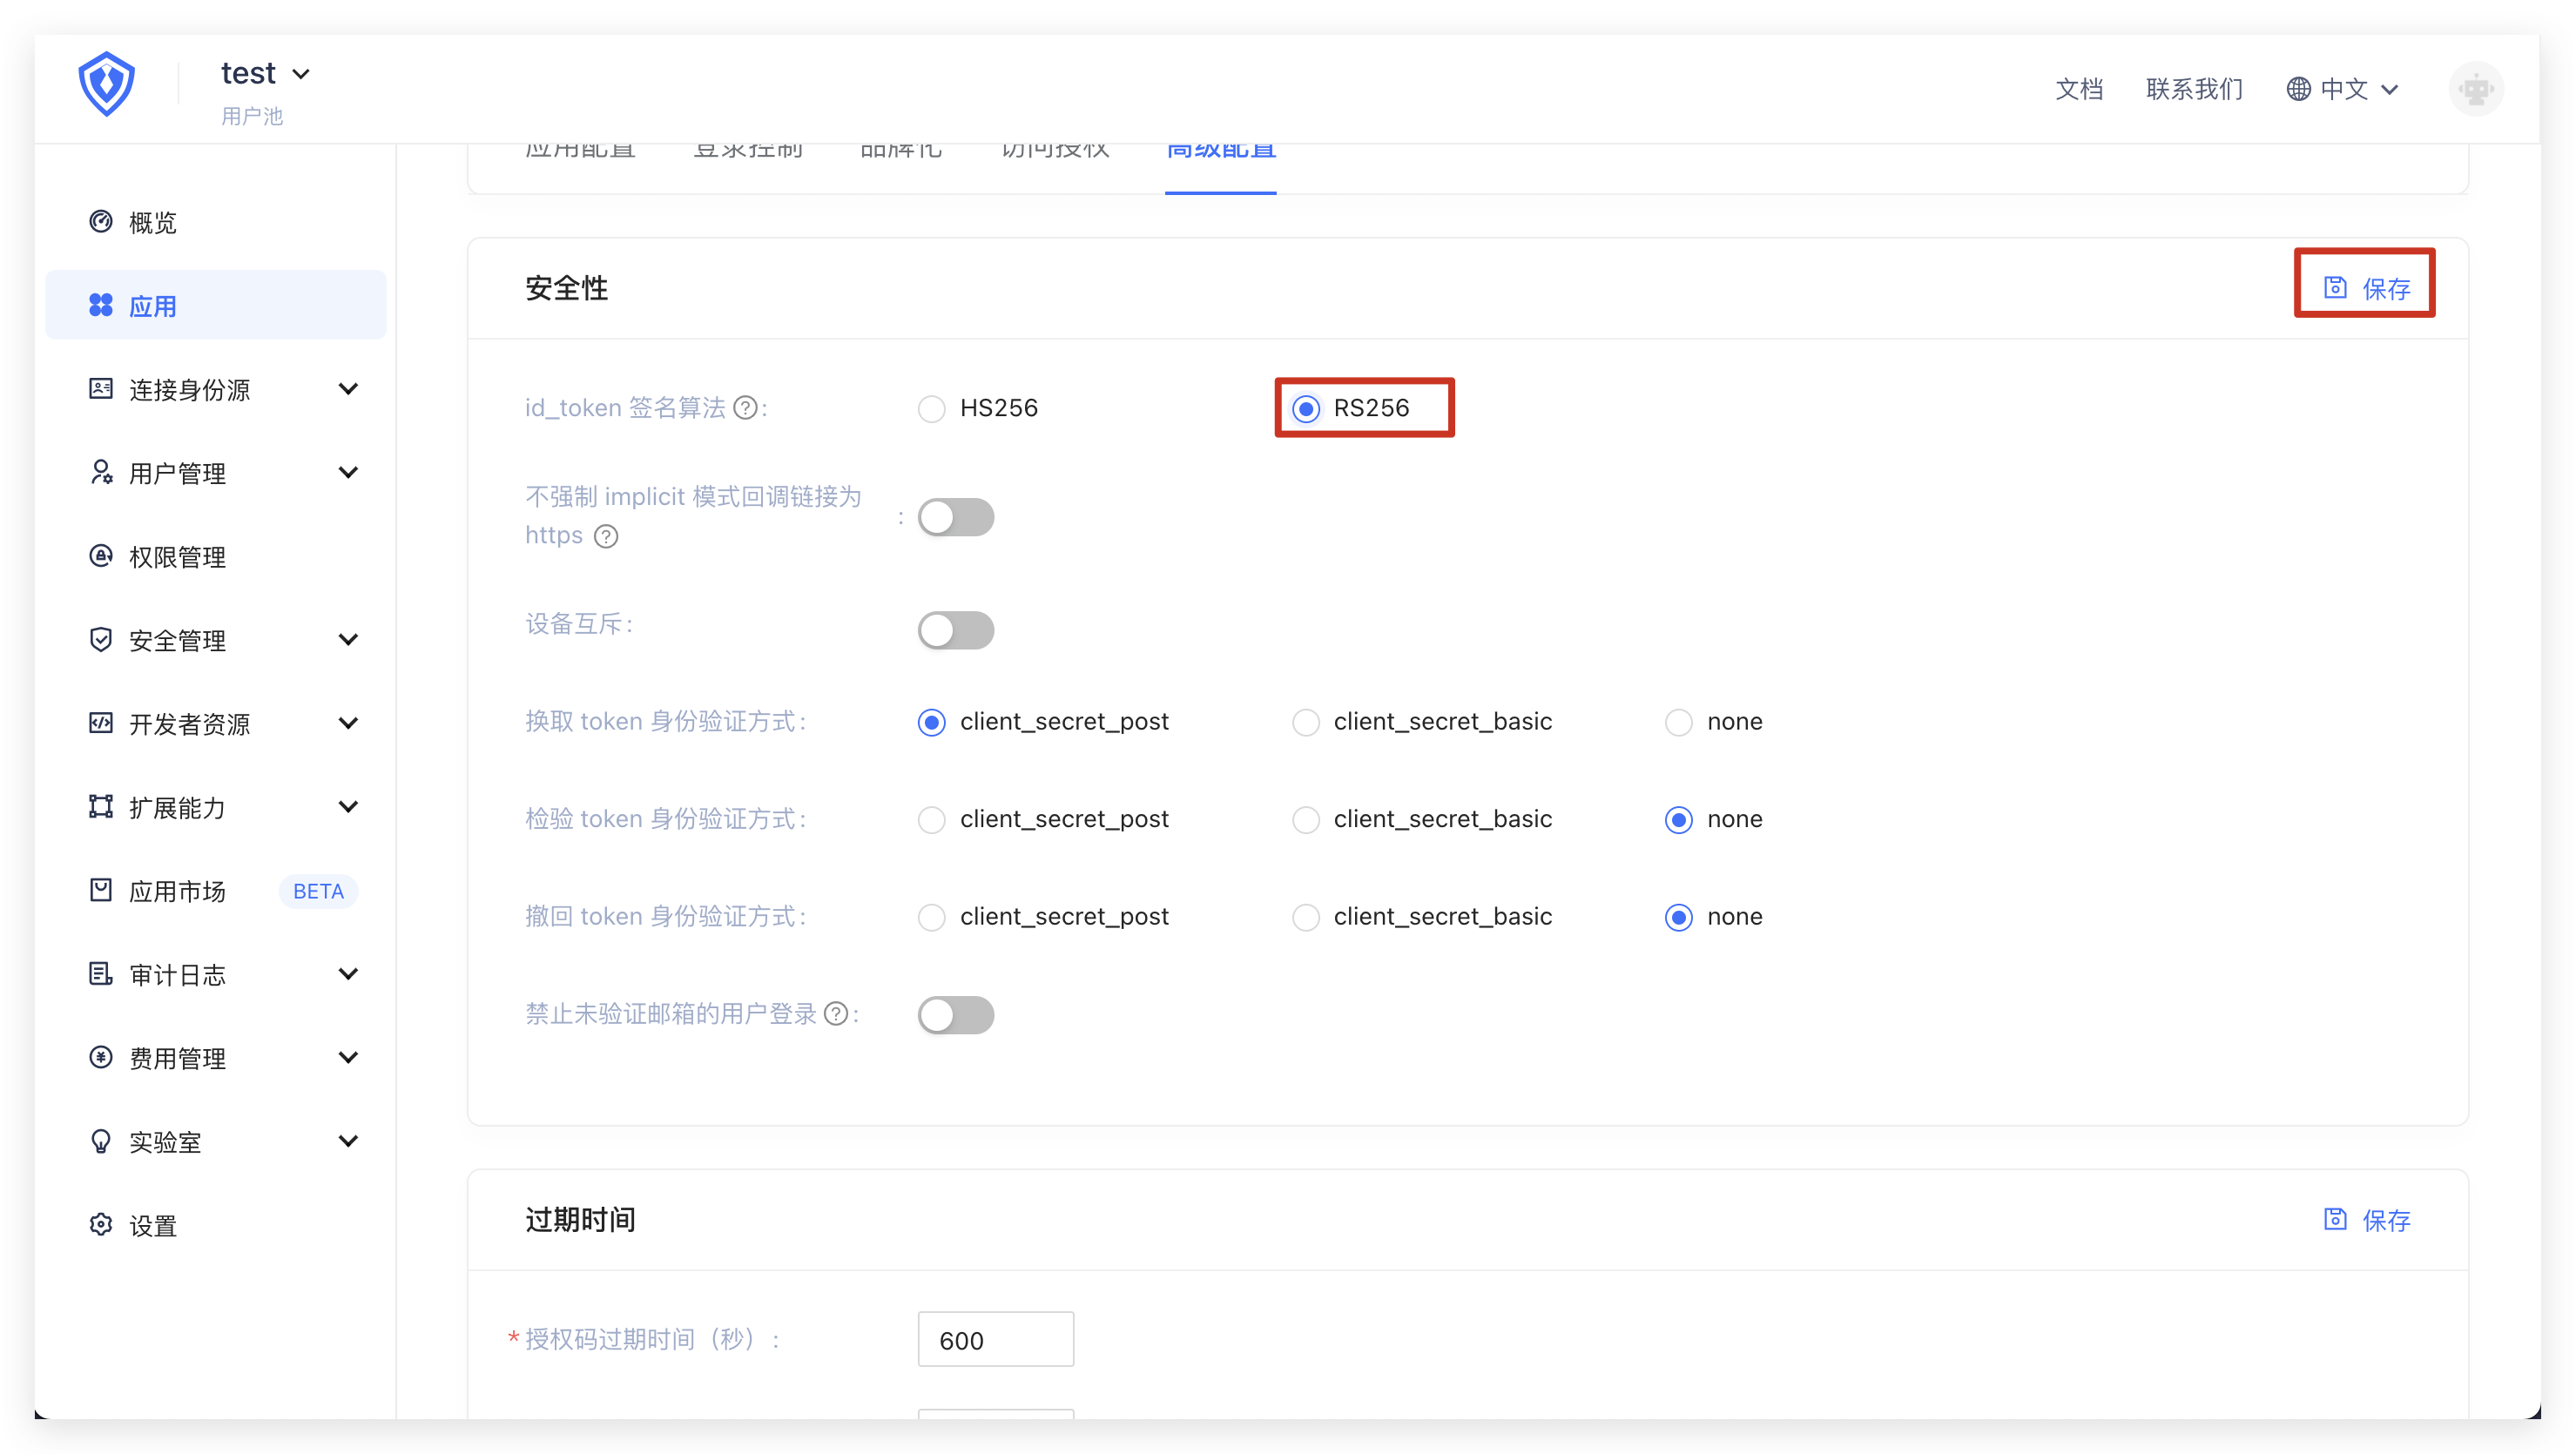
在应用列表找到你的应用,进入应用详情。在下方的「授权」卡片中,id_token 签名算法选择 RS256,然后点击保存。
¶ 配置登录回调地址
当用户在 Authing 完成认证后,Authing 会将用户重定向到回调地址。必须在这里配置回调地址白名单,否则用户会遇到回调地址不匹配的错误信息。本教程需要用到的回调地址是 http://localhost:5000/callback 请在登录回调地址中粘贴此链接。
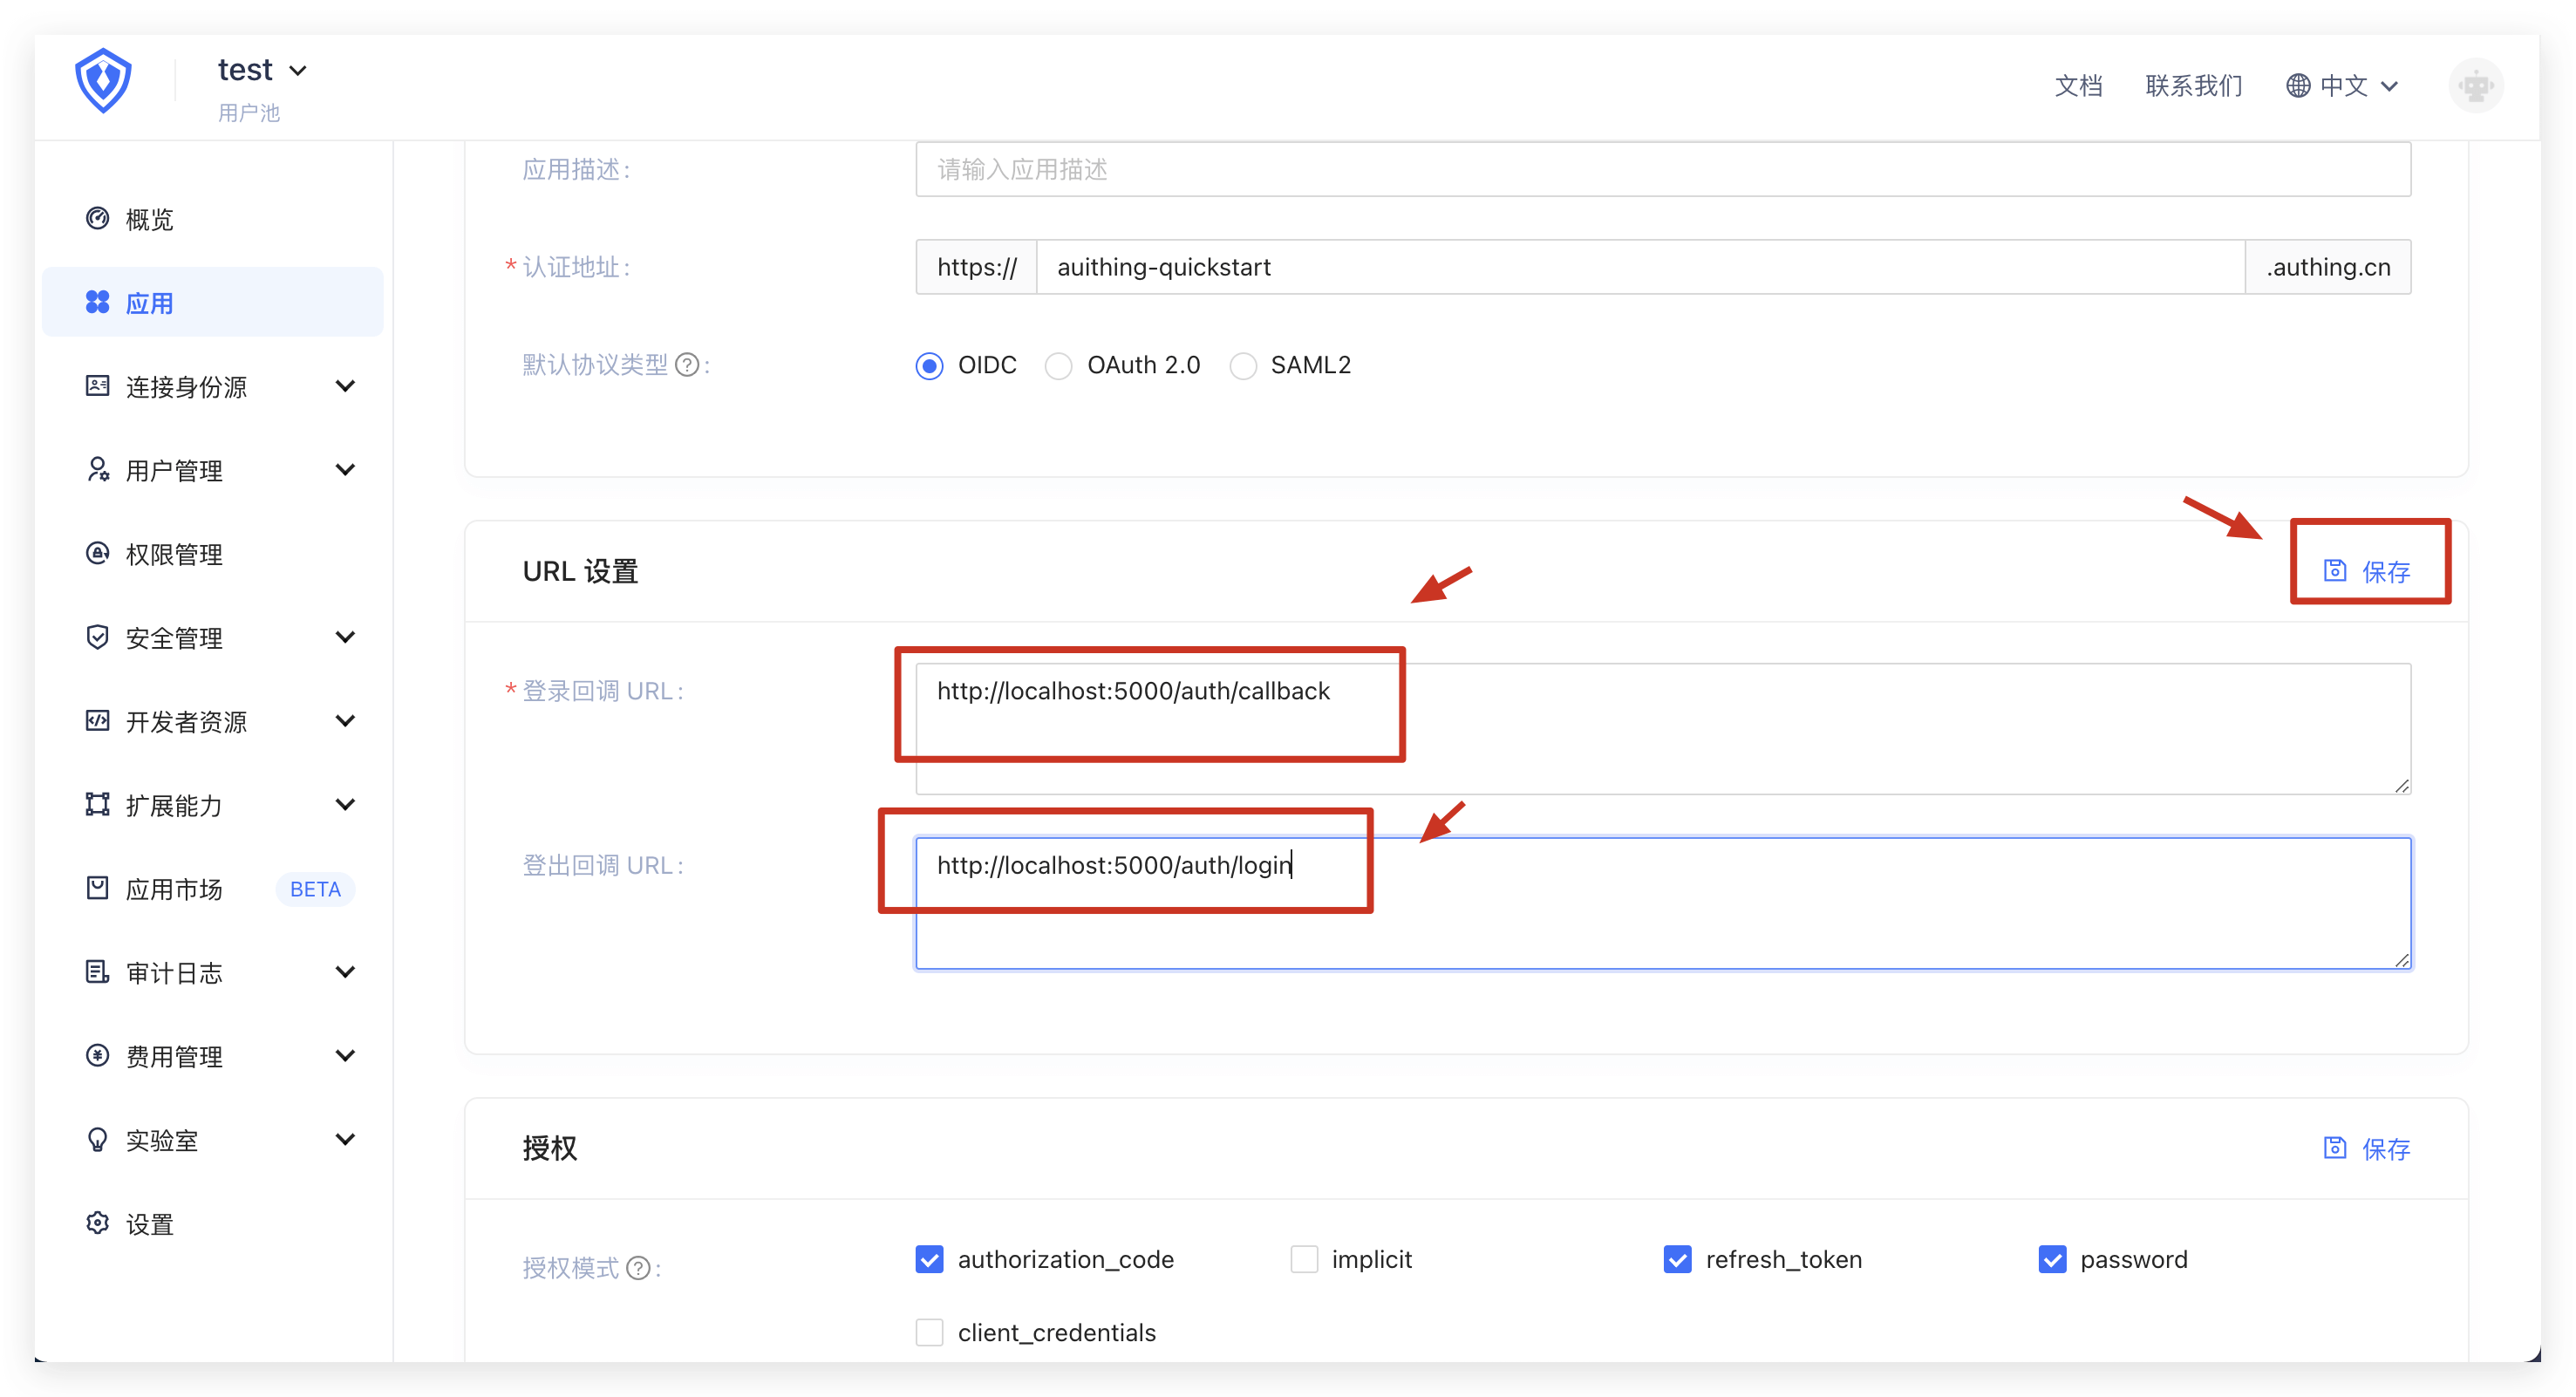
¶ 配置登出回调地址
当用户在 Authing 完成退出后,Authing 会将用户重定向到登出回调地址。必须在这里配置登出回调地址白名单,否则用户会遇到登出回调地址不匹配的错误信息。本教程需要用到的回调地址是 http://localhost:5000 请在登出回调地址中粘贴此链接。
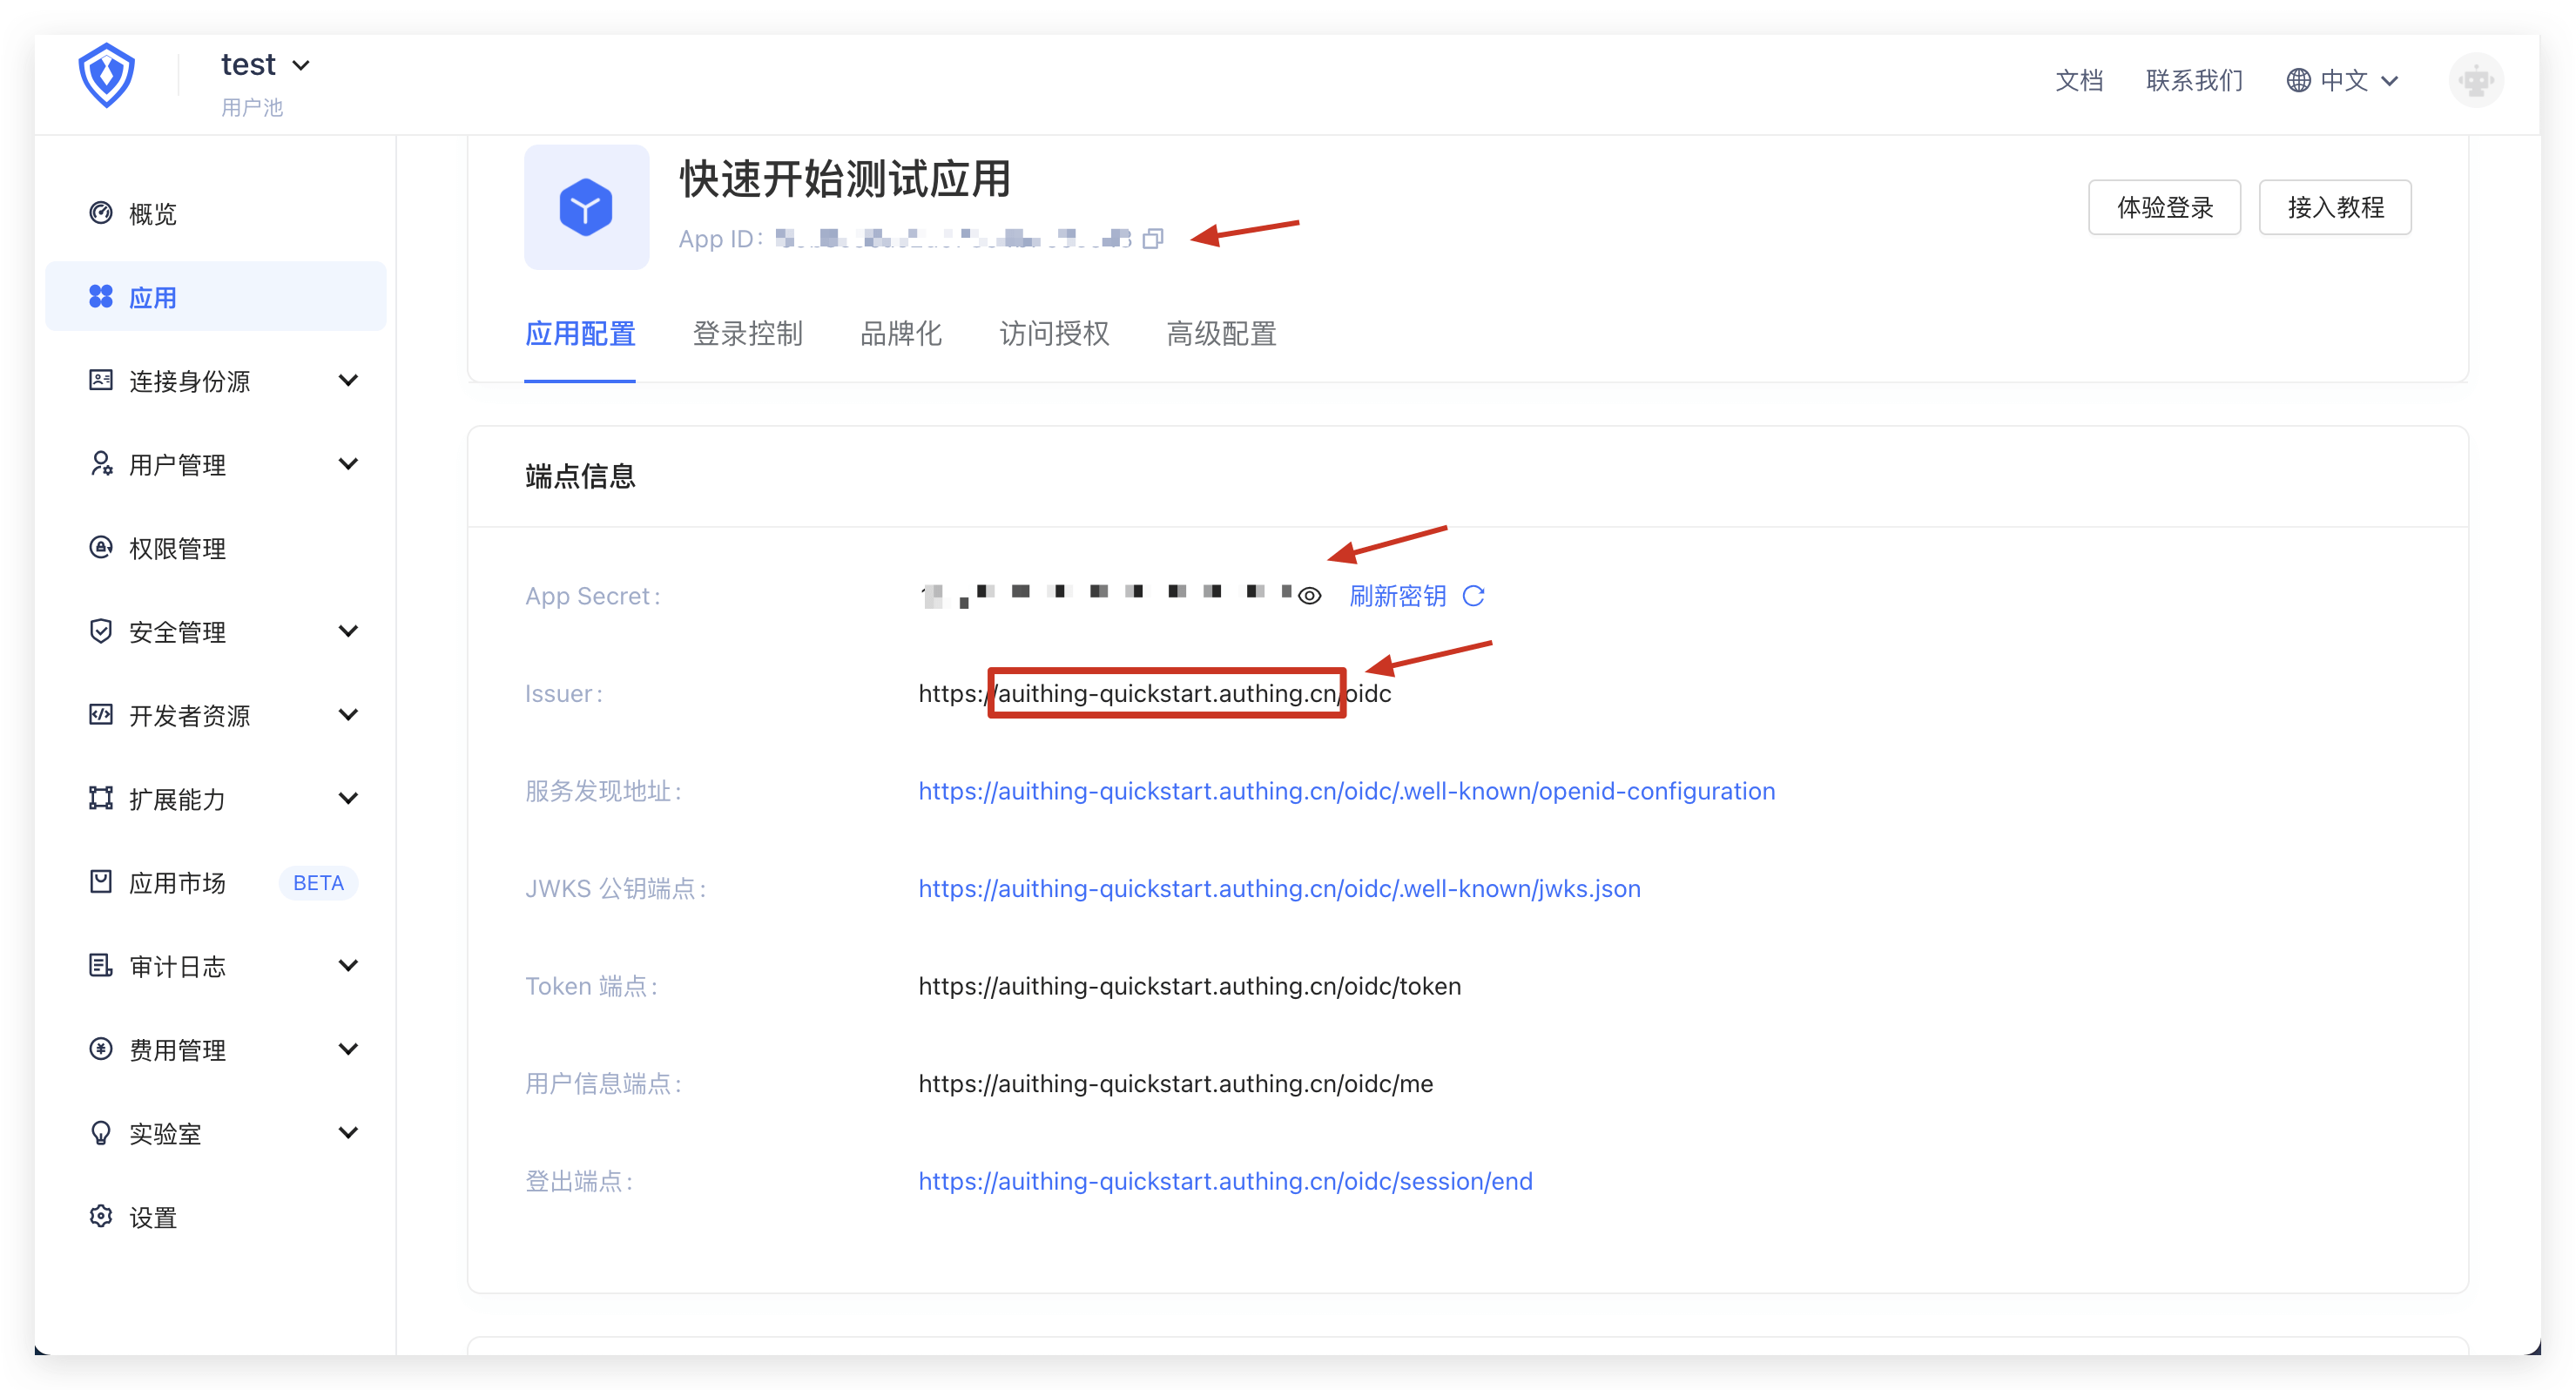
¶ 记录应用信息
记录以下信息:
- 应用 ID
- 应用密钥
- 应用域名
¶ 集成 Authing
¶ 初始化项目
dotnet new WebApi -n AuthingWebApi
¶ 添加相关项目配置信息
在 /appsettings.Development.json 中,增加相关配置信息,这些信息提供给 Authing.ApiClient 作为初始化信息。
{
  "Logging": {
    "LogLevel": {
      "Default": "Information",
      "Microsoft": "Warning",
      "Microsoft.Hosting.Lifetime": "Information"
    }
  },
  "Authing.Config": {
    "AppId": "AppId",
    "Secret": "AppSecret",
    "AppHost": "https://{your domain}.authing.cn",
    "RedirectUri": "http://localhost:5000/auth/callback"
  }
}
¶ 添加 Authing.ApiClient
接下来需要添加 Authing.Library (opens new window)
# 可以访问 nuget 地址使用最新版本 SDK,SDK 持续更新中,文档写时使用版本如下
dotnet add package Authing.Library --version {LATEST_VERSION}
注意检查最新版本号,格式如:0.0.32。
之后在 StartUp.cs 中完成初始化,并作为单例注册到容器中去,同时为了方便常见 HttpException 的抛出,注册使用 Opw.HttpExceptions.AspNetCore (opens new window)
public void ConfigureServices(IServiceCollection services)
{
    services.AddControllers();

    services.AddMvc().AddHttpExceptions();

    var authenticationClient = new AuthenticationClient(options =>
    {
        options.AppId = Configuration["Authing.Config:AppId"];
        options.AppHost = Configuration["Authing.Config:AppHost"];
        options.Secret = Configuration["Authing.Config:Secret"];
        options.RedirectUri = Configuration["Authing.Config:RedirectUri"];
    });
    // 将 authenticationClient 注册为单例,并加入容器中去
    services.AddSingleton(typeof(AuthenticationClient), authenticationClient);
    services.AddSwaggerGen(c =>
    {
        c.SwaggerDoc("v1", new OpenApiInfo { Title = "quickstart", Version = "v1" });
    });
}
¶ 添加 AuthController
使用 aspnet-codegenerator (opens new window) 生成 AuthController
dotnet aspnet-codegenerator controller -name Auth -outDir Controllers
此时在 /ConController 下会生成一个 AuthController 的模版类。在 AuthController 中增加可能要使用的实例,加入 _authenticationClient 和 _configuration,代码如下:
public class AuthController : ControllerBase
{
    private readonly AuthenticationClient _authenticationClient;
    private readonly IConfiguration _configuration;

    public AuthController(AuthenticationClient authenticationClient, IConfiguration configuration)
    {
        _authenticationClient = authenticationClient;
        _configuration = configuration;
    }
}
增加 AuthController 对应的路径 api/Auth,代码如下:
[ApiController]
[Route("[controller]")]
public class AuthController : ControllerBase
{
    private readonly AuthenticationClient _authenticationClient;
    private readonly IConfiguration _configuration;

    public AuthController(AuthenticationClient authenticationClient, IConfiguration configuration)
    {
        _authenticationClient = authenticationClient;
        _configuration = configuration;
    }
}
¶ 添加 GetLoginUrl
增加 GetLoginUrl 方法,路由为 login,使用 _authenticationClient 生成对应的 loginUrl:
[ApiController]
[Route("[controller]")]
public class AuthController : ControllerBase
{
    private readonly AuthenticationClient _authenticationClient;
    private readonly IConfiguration _configuration;

    public AuthController(AuthenticationClient authenticationClient, IConfiguration configuration)
    {
        _authenticationClient = authenticationClient;
        _configuration = configuration;
    }

    /// <summary>
    /// 借助 _authenticationClient 生成登录链接
    /// </summary>
    /// <returns>string</returns>
    [HttpGet]
    [Route("login")]
    public Task<RedirectResult> GetLoginUrl()
    {
        // 配置 OIDC 相关信息
        var oauthOption = new OidcOption
        {
            AppId = _configuration["Authing.Config:AppId"],
            RedirectUri = _configuration["Authing.Config:RedirectUri"]
        };
        // 生成对应的 loginUrl
        var loginUri = _authenticationClient.BuildAuthorizeUrl(oauthOption);
        return Redirect(loginUri);
    }
}
¶ 添加 HandleCallback
增加 HandleCallback 方法,路由为 callback,该方法主要处理认证过程中的 Code,使用 Code 换取 Token,再使用 Token 换取 用户信息,我们可能需要使用 HttpSession 来存储用户的状态,此时我们需要添加 Microsoft.AspNetCore.Session (opens new window):
dotnet add package Microsoft.AspNetCore.Session --version 2.2.0
考虑到 Session 中的存储值都为字符串,我们需要扩展 Session 的操作方法来完成扩展,方便将对象存储到 Session 之前先进行序列化操作,在取值之后序列化指定类型的对象,具体扩展在 /Extensions/SessionExtensions.cs 中,参考地址 (opens new window)。代码如下:
using System.Text.Json;
using Microsoft.AspNetCore.Http;

public static class SessionExtensions
{
    public static void Set<T>(this ISession session, string key, T value)
    {
        session.SetString(key, JsonSerializer.Serialize(value));
    }

    public static T Get<T>(this ISession session, string key)
    {
        var value = session.GetString(key);
        return value == null ? default : JsonSerializer.Deserialize<T>(value);
    }
}
同时需要在服务启动的时候,注册对应的服务
public void ConfigureServices(IServiceCollection services)
{
    services.AddControllers();
    services.AddMvc().AddHttpExceptions();

    //启用内存缓存(该步骤需在AddSession()调用前使用)
    services.AddDistributedMemoryCache();//启用session之前必须先添加内存
    //services.AddSession();
    services.AddSession(options =>
    {
        options.Cookie.Name = "This.Session";
        options.IdleTimeout = TimeSpan.FromSeconds(2000);//设置session的过期时间
        options.Cookie.HttpOnly = true;//设置在浏览器不能通过js获得该cookie的值
        options.Cookie.IsEssential = true;
    });

    // ------
}
之后增加 HandleCallback 方法,路由为 callback
[ApiController]
[Route("[controller]")]
public class AuthController : ControllerBase
{
    private readonly AuthenticationClient _authenticationClient;
    private readonly IConfiguration _configuration;

    public AuthController(AuthenticationClient authenticationClient, IConfiguration configuration)
    {
        _authenticationClient = authenticationClient;
        _configuration = configuration;
    }

    // ---

    /// <summary>
    /// 处理授权之后的回调,借助 _authenticationClient 将回调得到的 Code 信息换取 Token 信息,之后跳转到 /auth/profile
    /// </summary>
    /// <param name="Code">回调传入的 Code 信息</param>
    /// <returns>Redirect</returns>
    [HttpGet]
    [Route("callback")]
    public async Task<RedirectResult> HandleCallback([FromQuery] string Code)
    {
        // 无效 Code 处理
        if (Code == null)
        {
            throw new BadRequestException("code 无效");
        }
        CodeToTokenRes tokenInfo;
        try
        {
            // 错误的 Code 可能会导致换取 Token 失败,出现异常大部分都是 Code 错误的原因
            tokenInfo = await _authenticationClient.GetAccessTokenByCode(Code);
        }
        catch (Exception)
        {
            // 抛出错误处理,传入 Code 有问题
            throw new BadRequestException("code 无效");
        }
        var token = tokenInfo.AccessToken;
        UserInfo userInfo;
        try
        {
            // 通过 Token 获取用户信息,错误的 Token 可能会导致异常
            userInfo = await _authenticationClient.GetUserInfoByAccessToken(token);
            // 将 Token 信息存储到 userInfo 中
            userInfo.Token = token;
        }
        catch (Exception)
        {
            throw new BadRequestException("token 无效"); ;
        }
        // 将 userInfo 存储到 Session 中
        HttpContext.Session.Set("user", userInfo);
        HttpContext.Session.Set("useridtoken", tokenInfo.IdToken);
        return Redirect("/auth/profile");
    }
}
¶ 添加 GetLogoutUrl
增加 GetLogoutUrl 方法,路由为 logout:
[ApiController]
[Route("[controller]")]
public class AuthController : ControllerBase
{
    private readonly AuthenticationClient _authenticationClient;
    private readonly IConfiguration _configuration;

    public AuthController(AuthenticationClient authenticationClient, IConfiguration configuration)
    {
        _authenticationClient = authenticationClient;
        _configuration = configuration;
    }

    // ---

    /// <summary>
    /// 借助 _authenticationClient 生成用户登出 url,并跳转
    /// </summary>
    /// <returns>RedirectResult</returns>
    [HttpGet]
    [Route("logout")]
    public RedirectResult GetLogoutUrl()
    {
        // 根据配置信息生成登出 url
        var url = _authenticationClient.BuildLogoutUrl(new LogoutParams
        {
            Expert = true,
            IdToken = HttpContext.Session.GetString("useridtoken").Trim('"'),
            // 跳转 url 可以自定义,当用户登出成功时将跳转到这个地址,此处默认为 "http://localhost:5000"
            RedirectUri = "http://localhost:5000/auth/login",
        });
        // 清除 Session 中的用户信息
        HttpContext.Session.Clear();
        return Redirect(url);
    }
}
¶ 添加 GetUserInfo
增加 GetLogoutUrl 方法,路由为 profile:
[ApiController]
[Route("[controller]")]
public class AuthController : ControllerBase
{
    private readonly AuthenticationClient _authenticationClient;
    private readonly IConfiguration _configuration;

    public AuthController(AuthenticationClient authenticationClient, IConfiguration configuration)
    {
        _authenticationClient = authenticationClient;
        _configuration = configuration;
    }

    // ---

    [HttpGet]
    [Route("profile")]
    [Produces("application/json")]
    public object GetUserInfo()
    {
        // 考虑到 userInfo 是存储到 Session 中,如果 Session 中没有 userInfo 则代表用户没有进行登录
        if (HttpContext.Session.Get<UserInfo>("user") != null)
        {
            // 从 Session 中获取 userInfo 并返回
            var userInfo = HttpContext.Session.Get<UserInfo>("user");
            return userInfo;
        }
        // 如果用户没有进行登录,则跳转到 /auth/login 进行登录
        return Redirect("/auth/login");
    }
}
¶ 相关测试
¶ 运行项目
dotnet run
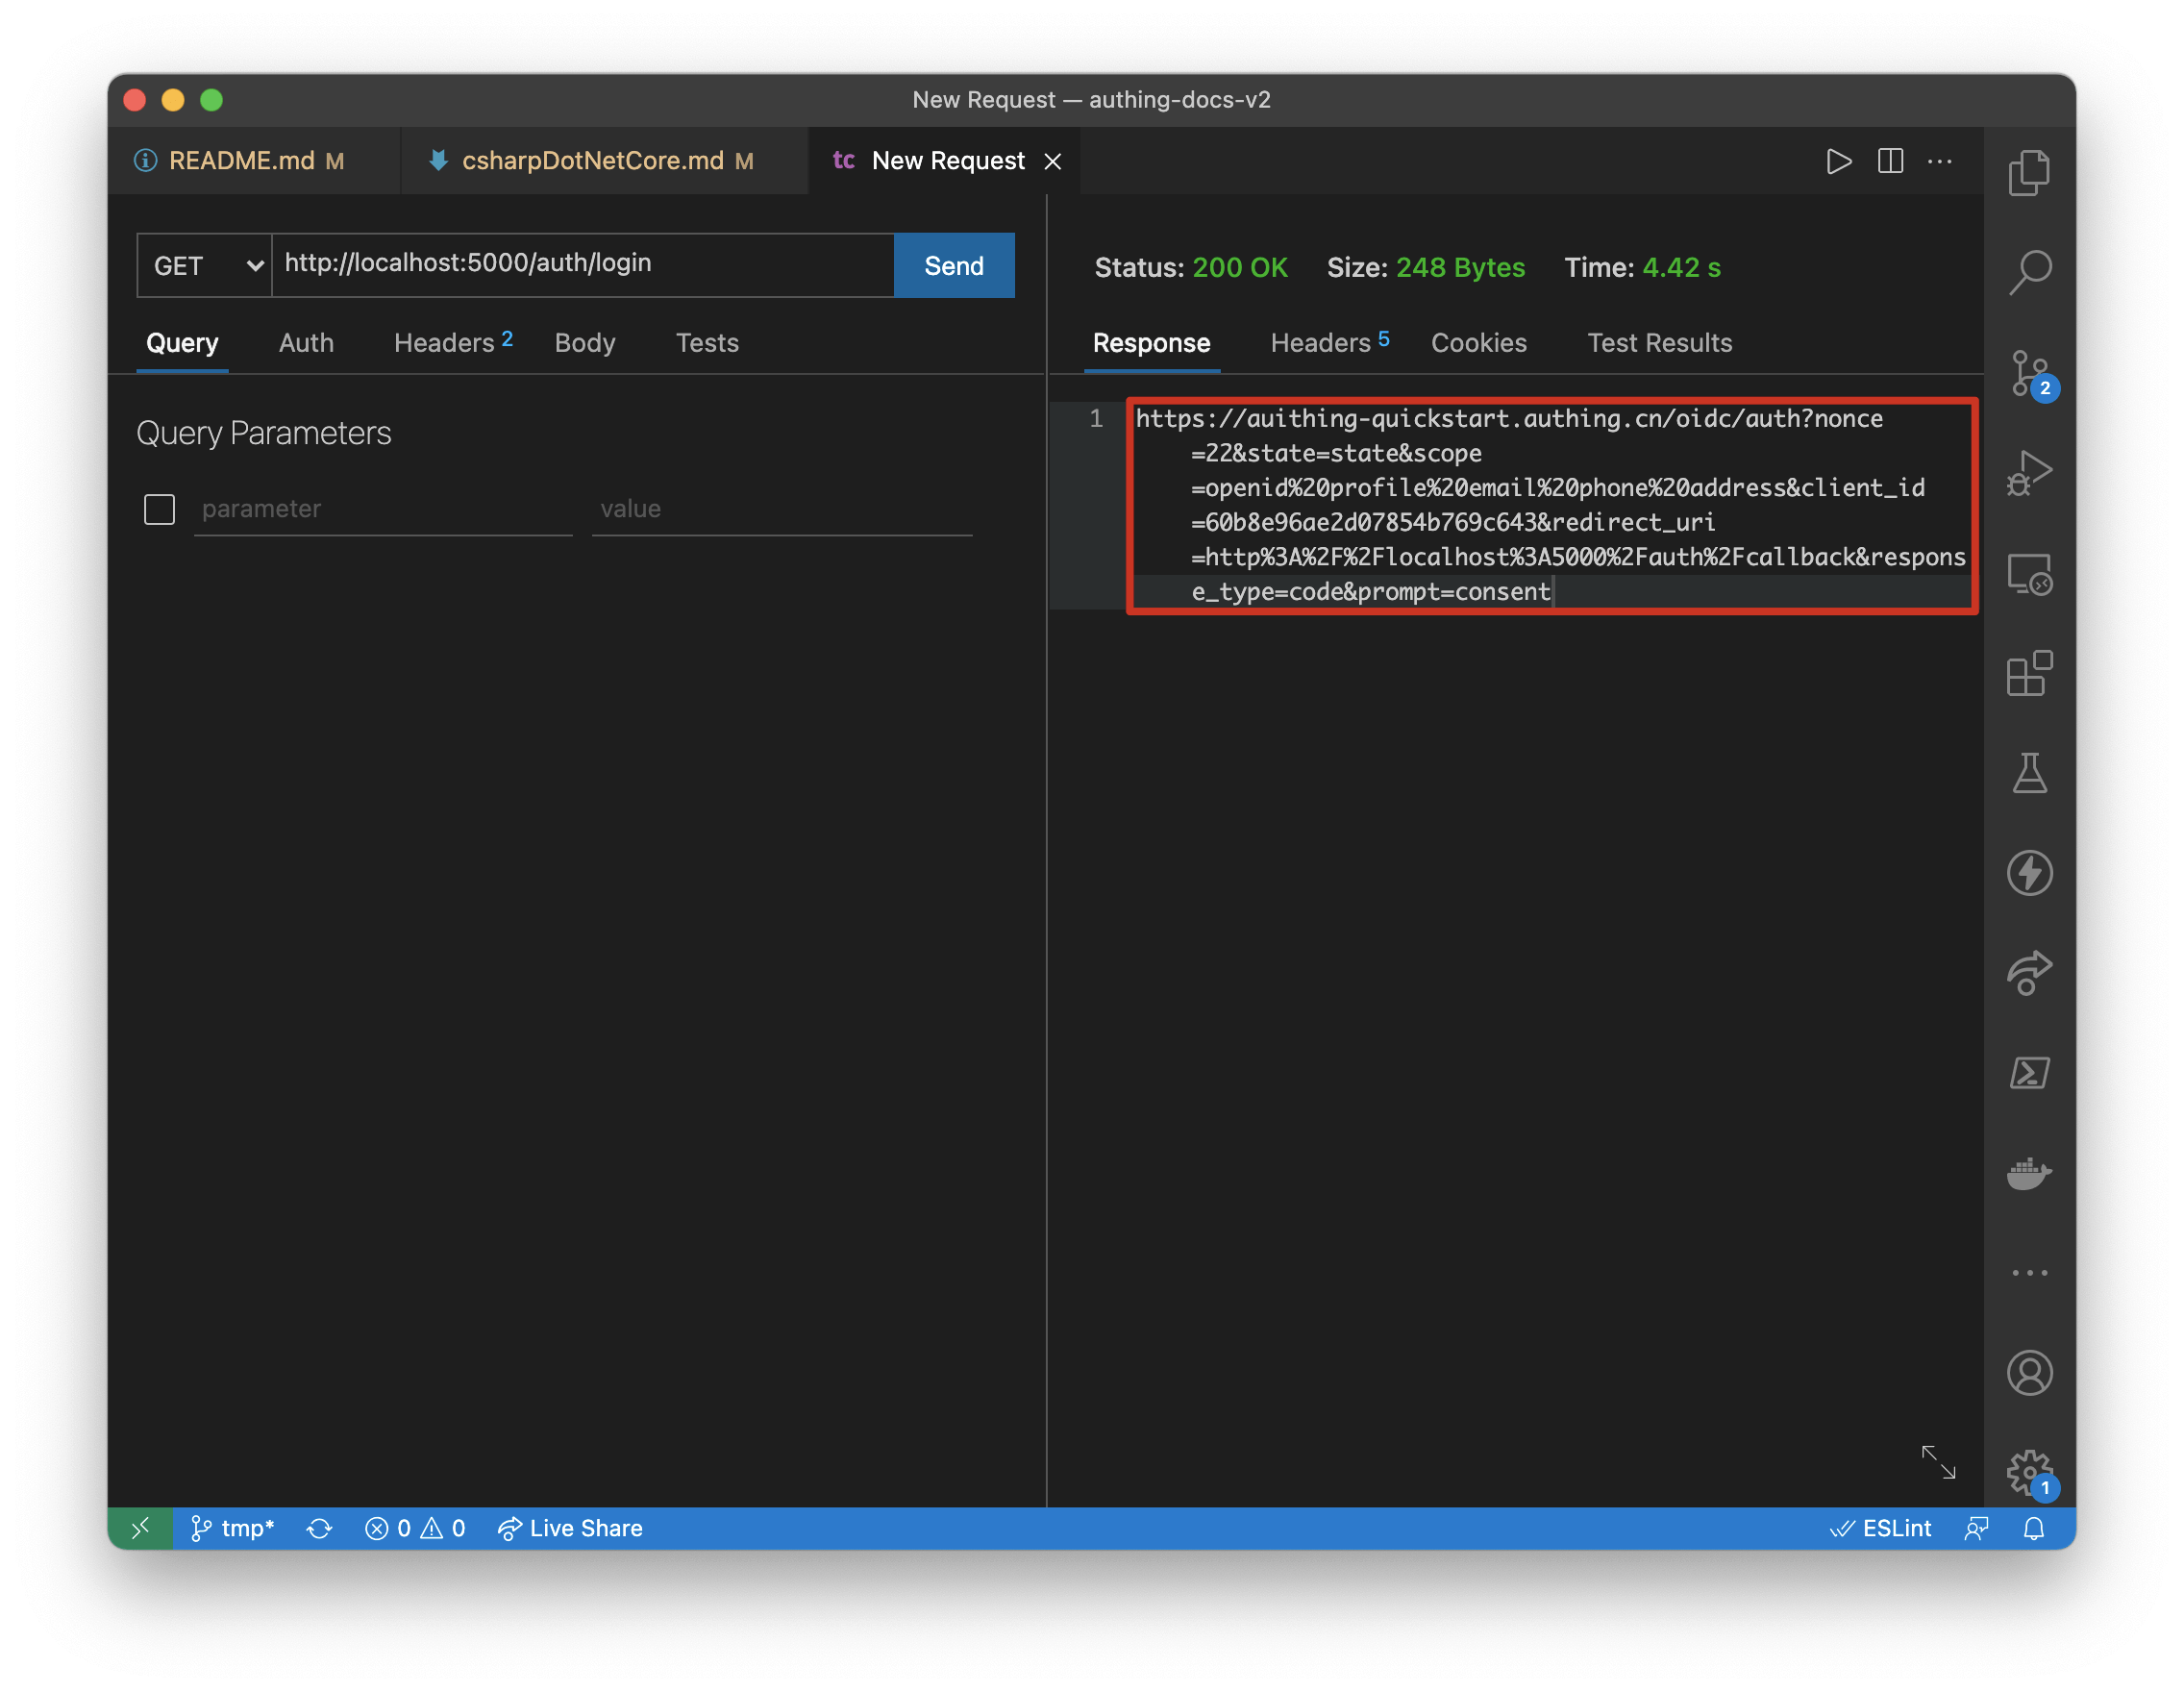
¶ 获取登录 url
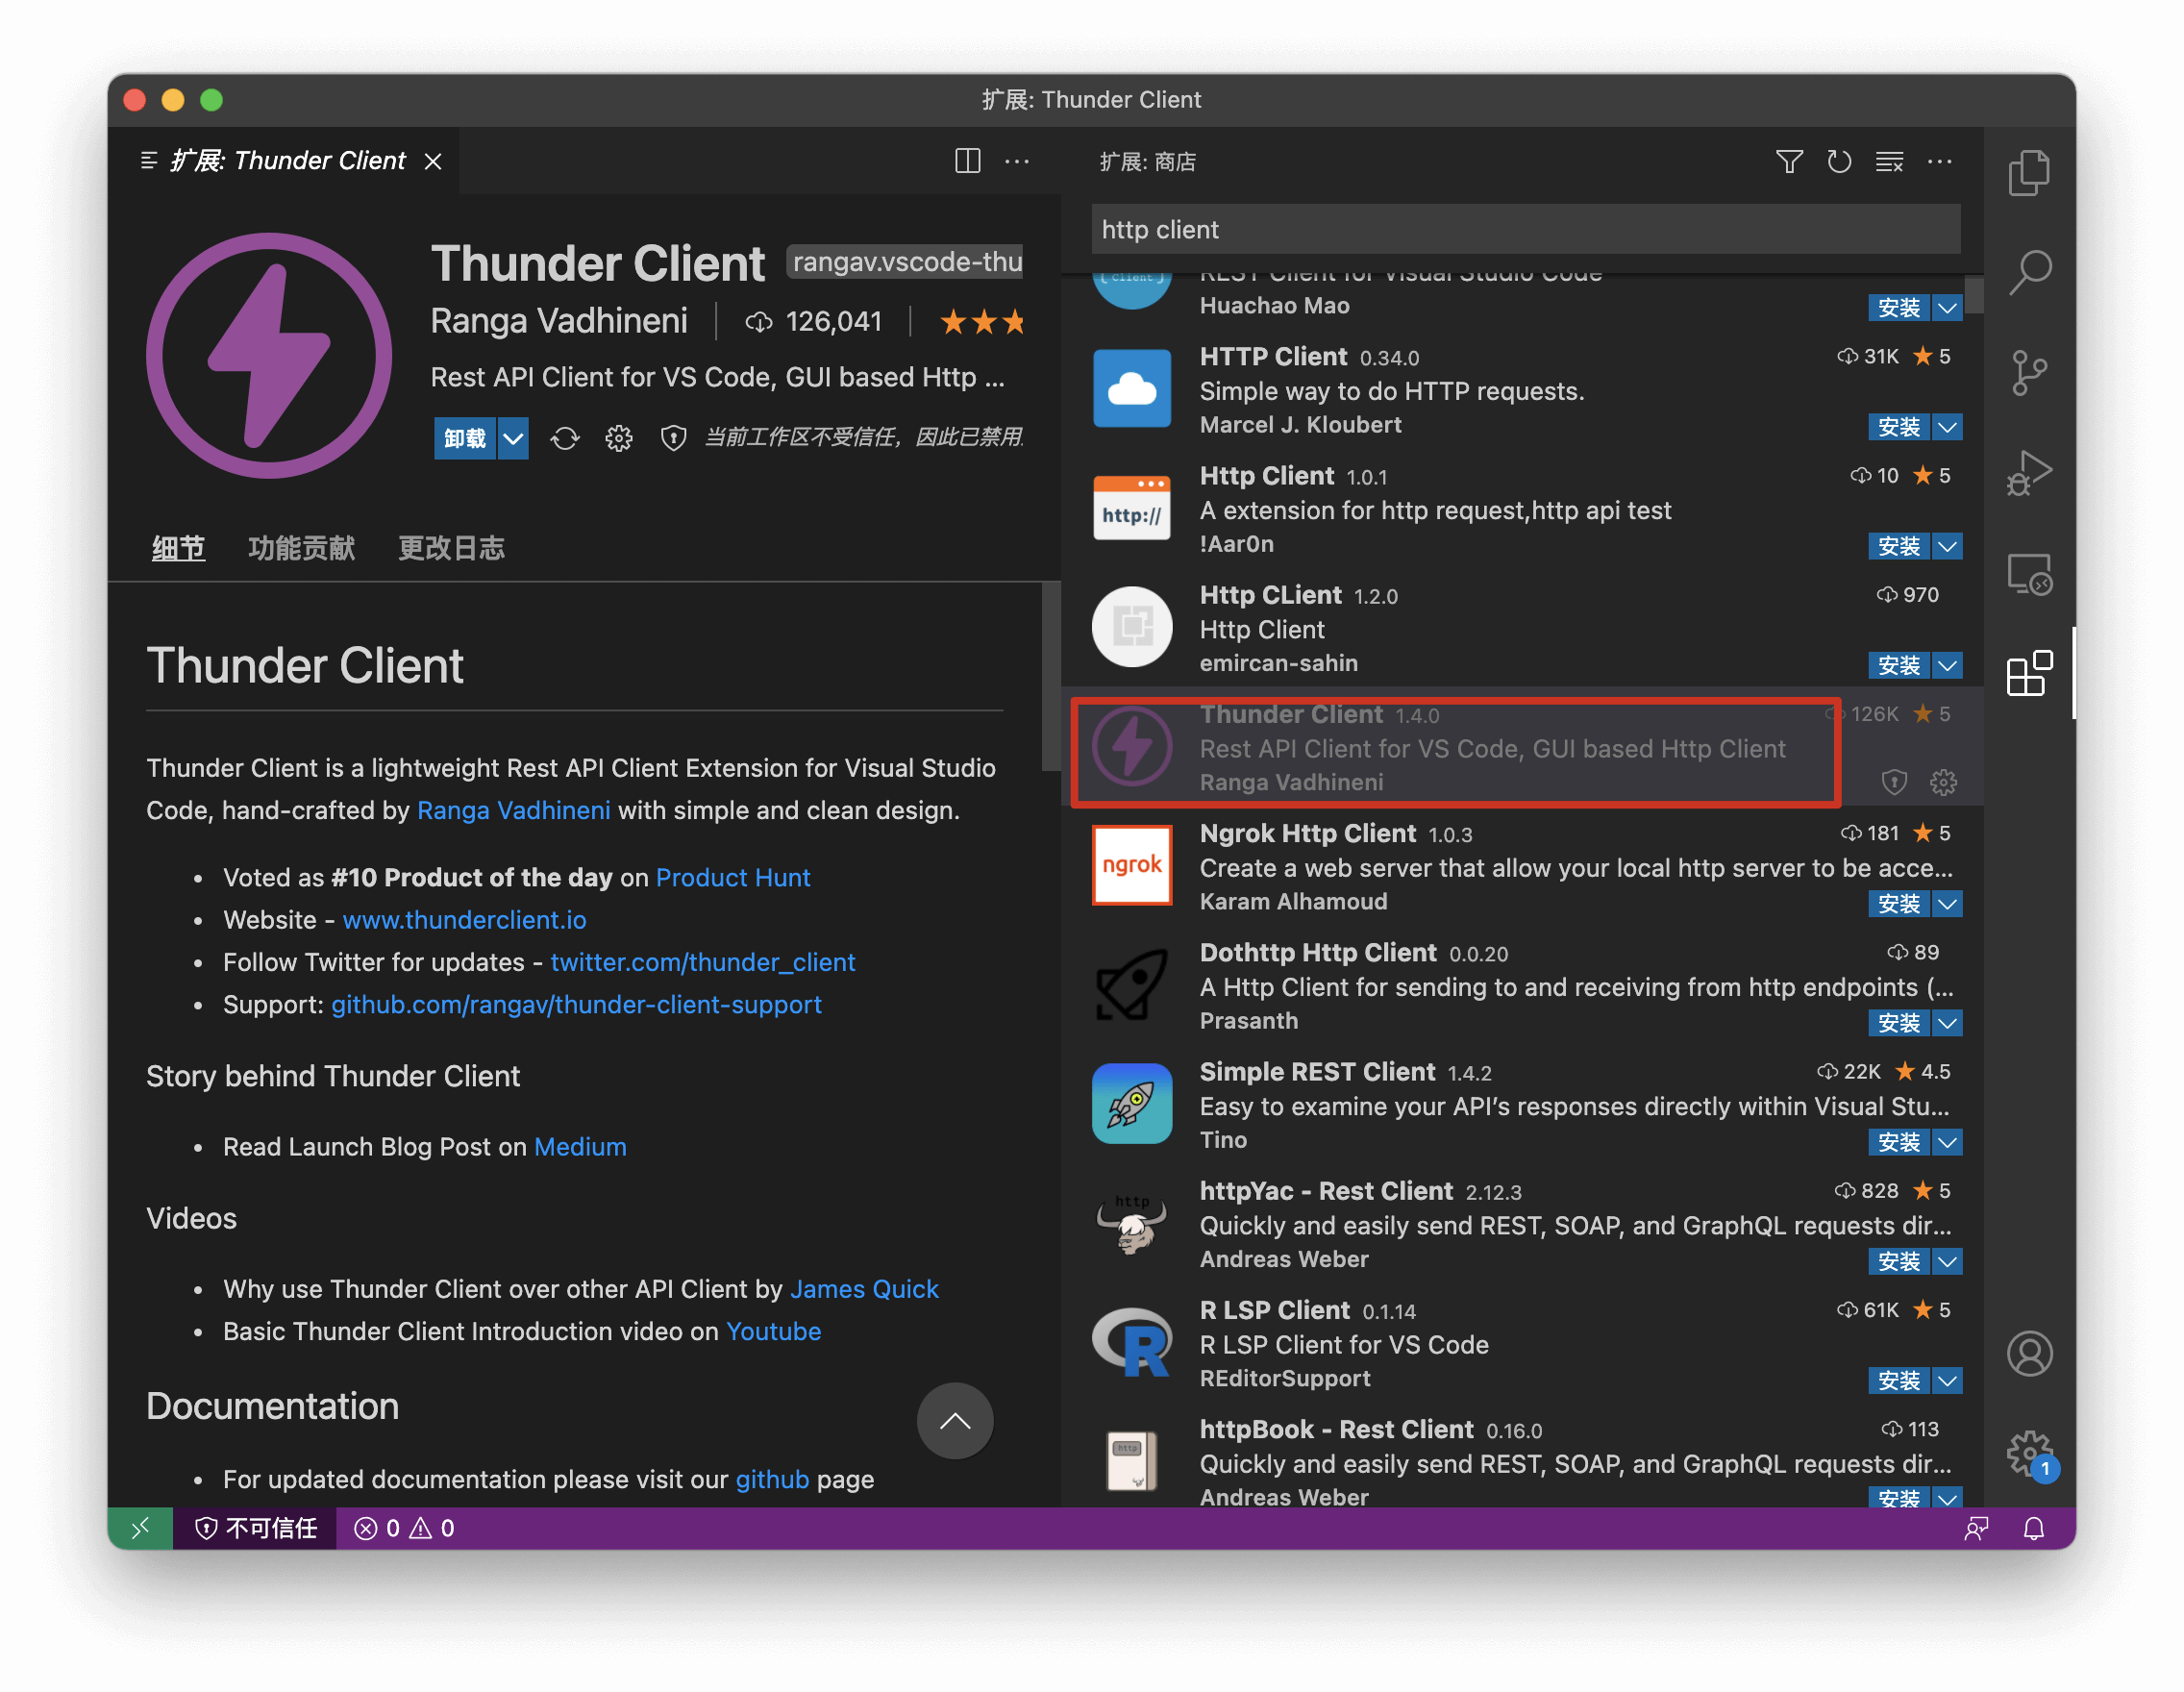
使用
HttpClient完成对应接口请求,比如post man,这里使用 VS code 插件Thunder Client。
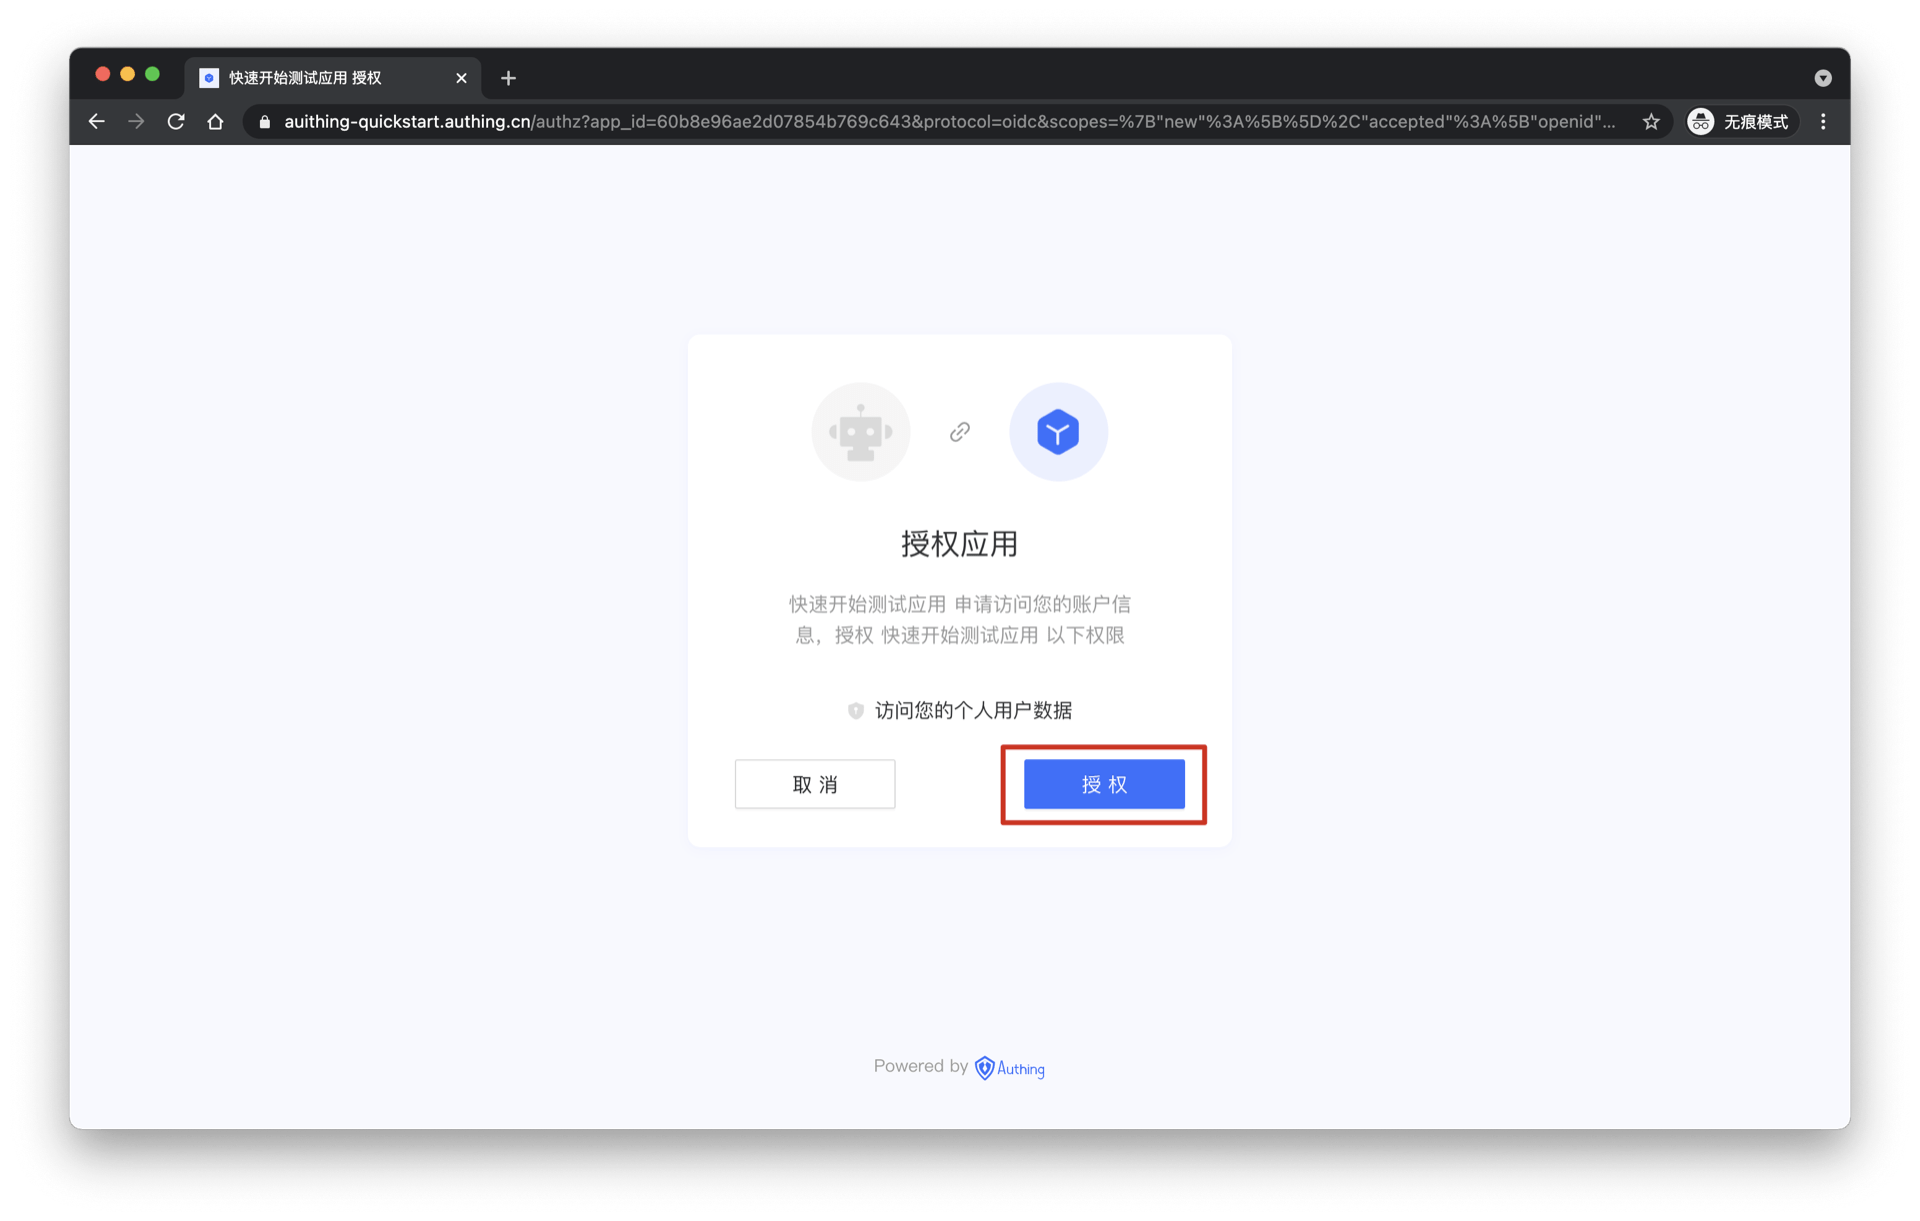
¶ 登录
¶ 获取 Token

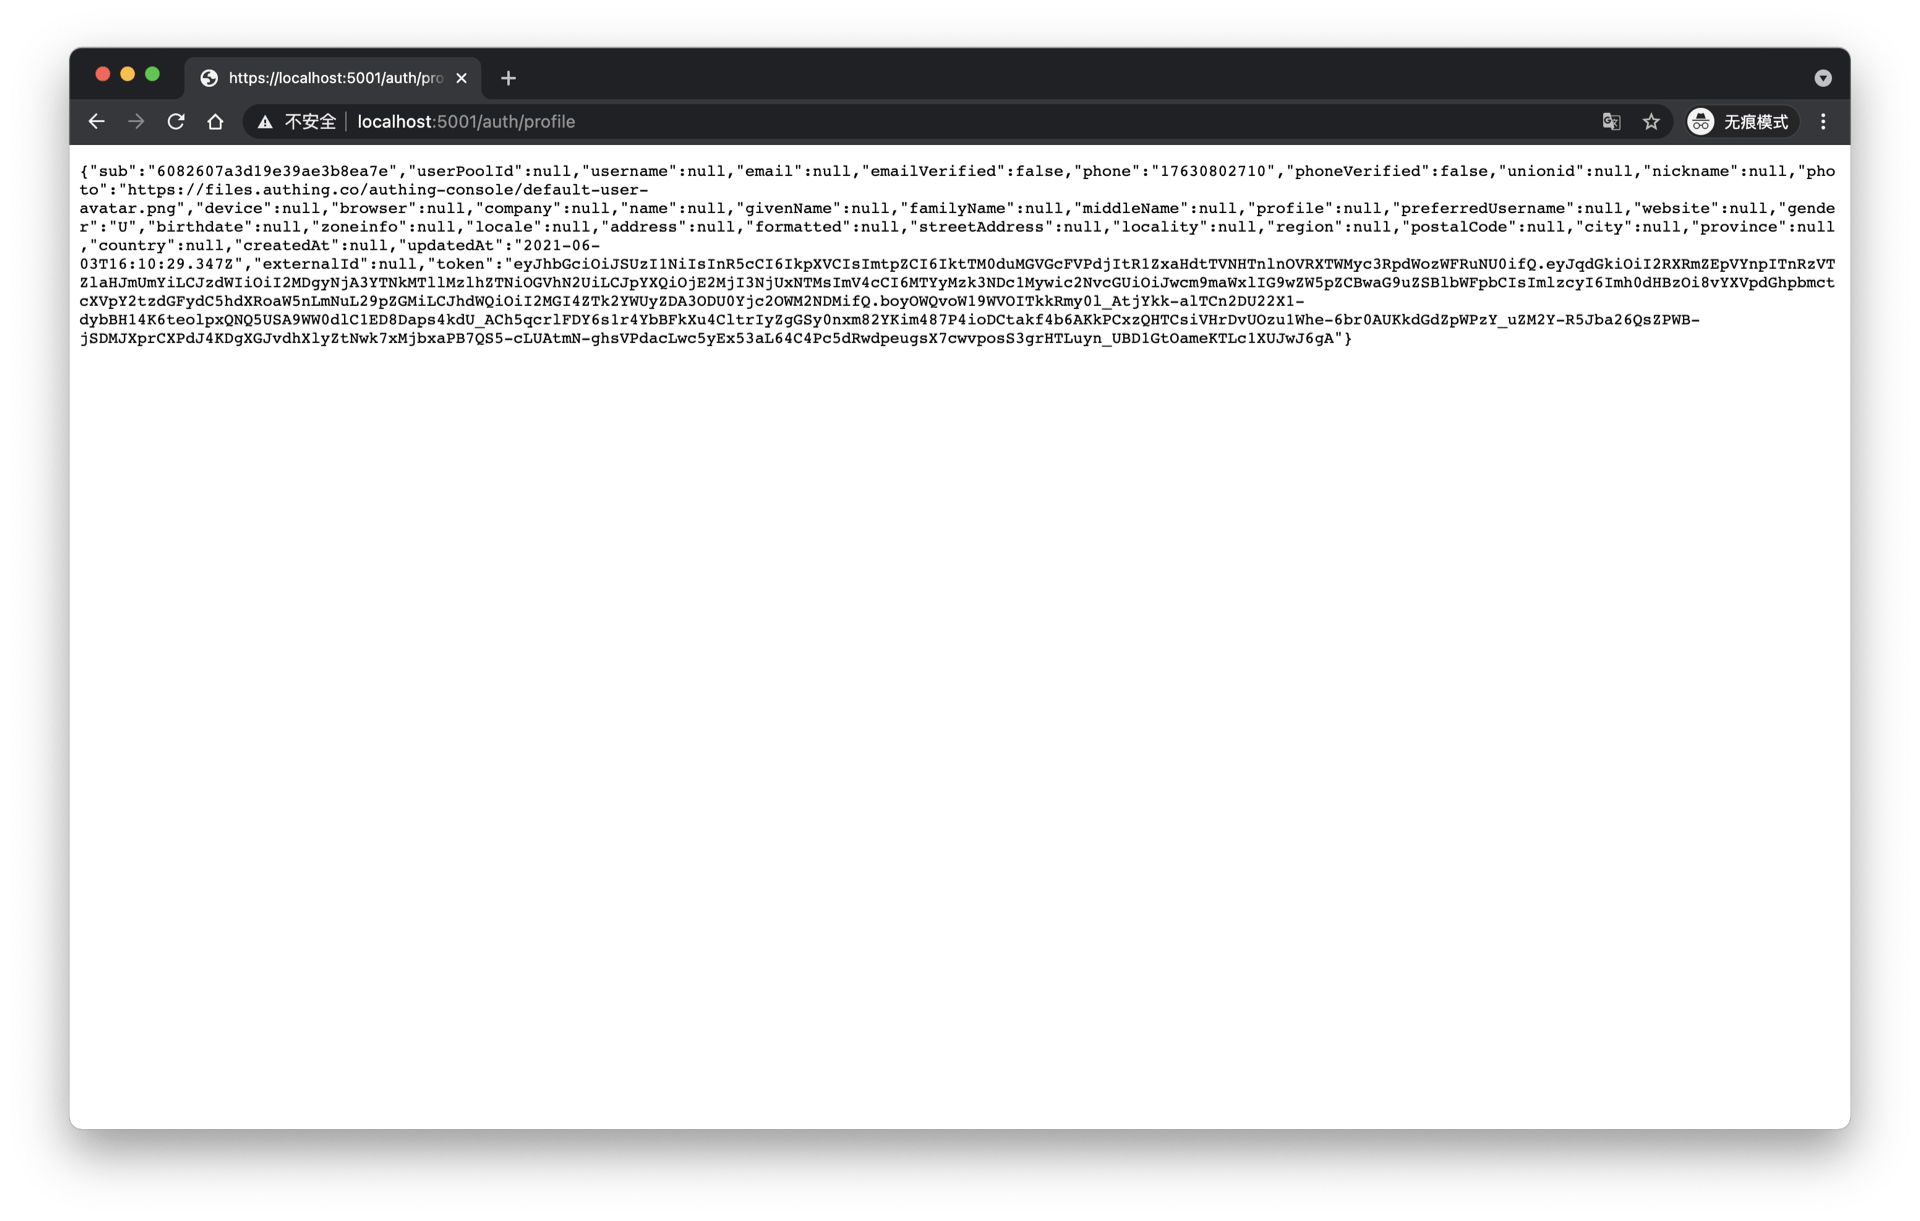
¶ 获取用户信息
¶ 登出

¶ 接下来你可能需要
调用其他资源 API:
.Net Core Web API Server 快速开始自建应用 SSO 方案:
单点登录 SSO 综述