¶ Spring Security integrated Authing OAuth 2.0 Start quickly
This article uses Spring Security for certification and access control in Spring ecology as an example, and details Spring Security How to Access Authing Oauth 2.0
Spring Security is a Security framework for secure access control solutions. It provides a set of Beans that can be configured in the Spring application context. Make full use Spring IOC(Control reverse)、DI(Dependency injection)and AOP(Stem programming)function,Application system Provide a stateless security access control function, Enhanced business System security, and Reduce write a lot Repeat code the burden.
Spring Security main features mainly include:
- Certification
- Authorize
- Attack protection
¶ Integration introduction
OAuth 2.0 protocol defines how to access the HTTP service related specification with limited authority, able to pass Building a resource owner and HTTP service license interactive mechanismLet third-party applications represent the resource owner access service, or give a third-party application by granting permissions, allowing it to visit the service. Spring Security is Powerful and Highly customizable authentication and access control framework. It is the actual standard for protecting Spring-based applications. It is committed to Java applications Provide authentication and authorization. Like all Spring projects, the true power of Spring Security is easy to expand to meet custom requirements.
The OAuth 2.0 service provided by Authing is taken as an example. Will detail the method of integrating Authing OAuth 2.0 single sign-in using Spring Security
- Development tools: IDEA
- Project Management Tool: Maven
- JDK version: 1.8
¶ Configure Authing
¶ Obtain Authing Platform information
First, you must register an account at Authing and enter the console, and create a user pool according to the boot step.
Click on the "Application" menu item on the left, you will see a default creation application on the right. 
Click "Configuration", see the App ID, App Secret, and Issuer url, please save it properly and then use this information. 
Then you need to add at the callback address http://localhost:8080/login/oauth2/code/authing The subsequent options are consistent with the following figure.
Spring Security OAuth 默认的回调地址为 /login/oauth2/code/{clientId}

'Confirm to open OAuth 2.0 service and configure 
¶ Project construction
¶ Add dependence
Add Spring Web,Spring Security,Spring Oauth2 Client dependence 
<dependencies>
   <dependency>
     <groupId>org.springframework.boot</groupId>
     <artifactId>spring-boot-starter-oauth2-client</artifactId>
   </dependency>
   <dependency>
       <groupId>org.springframework.boot</groupId>
       <artifactId>spring-boot-starter-security</artifactId>
   </dependency>
   <dependency>
       <groupId>org.springframework.boot</groupId>
       <artifactId>spring-boot-starter-web</artifactId>
   </dependency>
    <dependency>
        <groupId>cn.authing</groupId>
        <artifactId>java-core</artifactId>
        <version>{LATEST_VERSION}</version>
    </dependency>
</dependencies>
¶ Authorized code mode
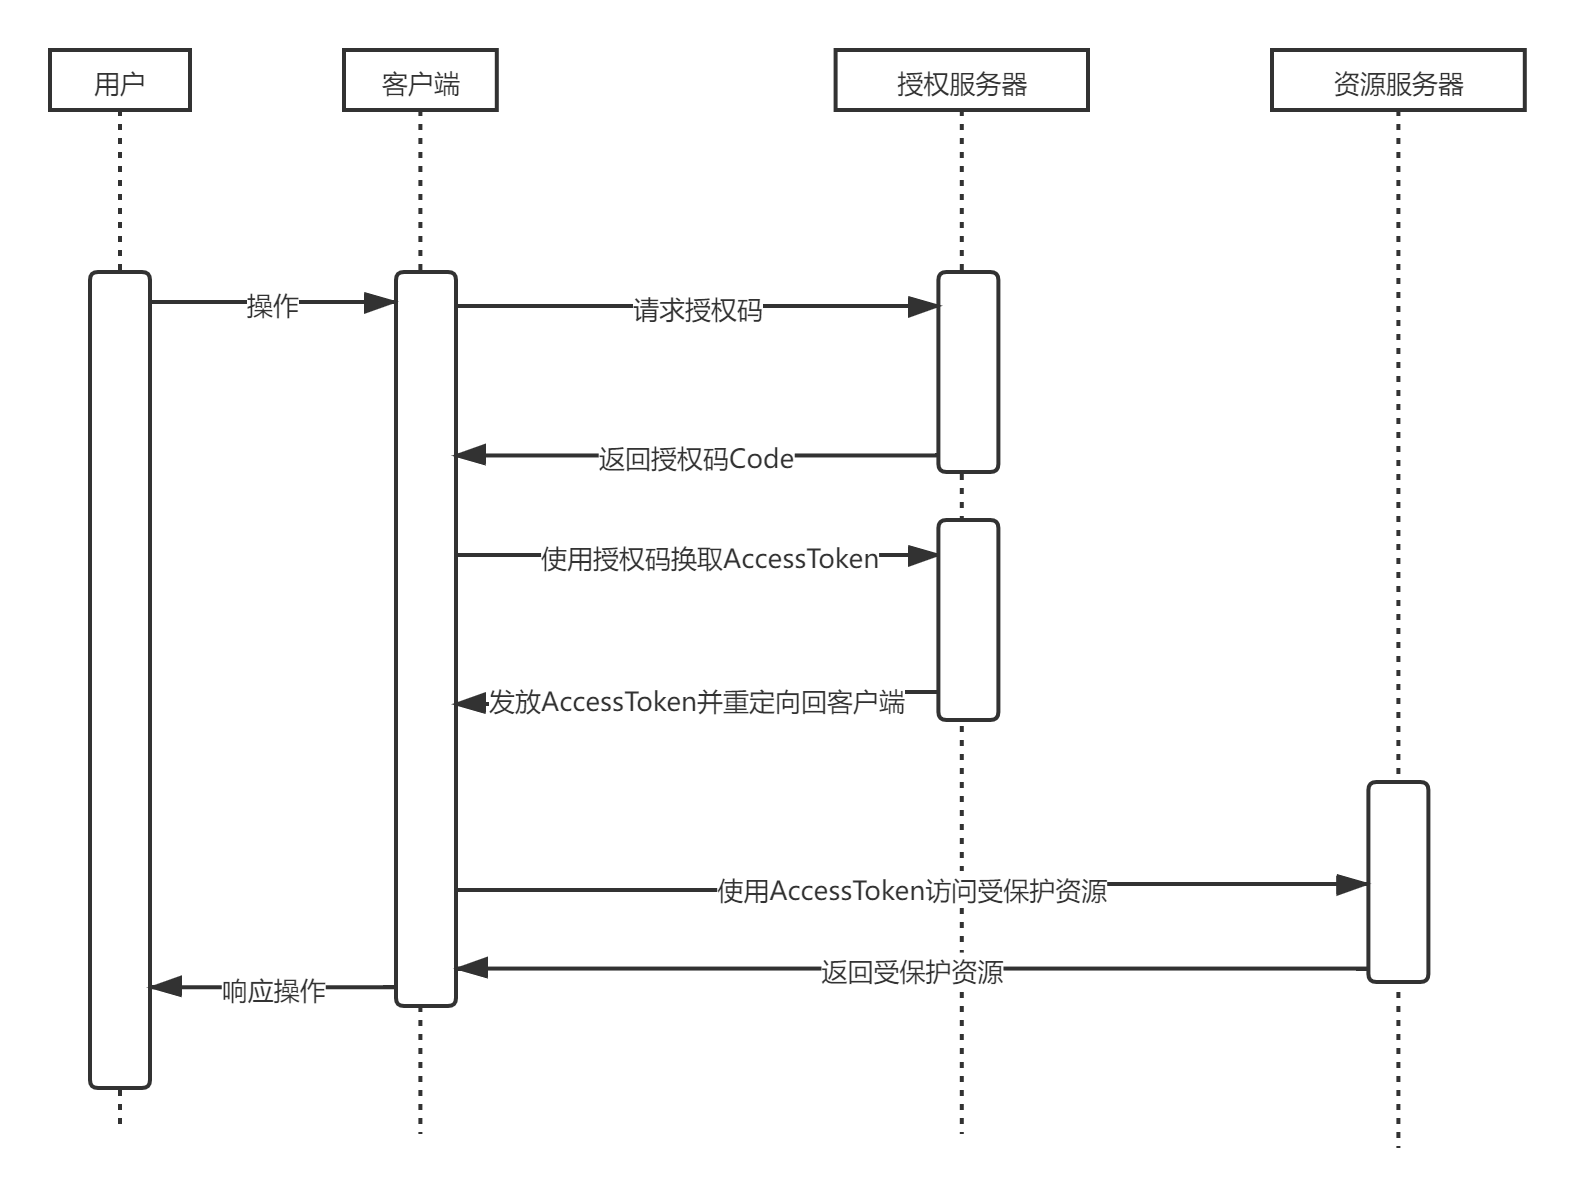
¶ Authorized code mode workflow
- User access Client, Client By redirecting users to Authorization server
- Authorization server for Resource owner regular authentication, redirection after successful authentication Client and return Authorization code
- Client by Authorization code and Authorization server Exchange access Access token
- Client use Access token access Resource server
- Resource server Verify access tokens and return protected data
The implementation flow chart is as follows

¶ Modify the project configuration file
find src/main/resources/application.properties, Fill in item information:
server.port=8081
spring.security.oauth2.client.registration.authing.client-id={替换为你的App ID如:App Secret5e72d72e3798fb03e1d57b13}
spring.security.oauth2.client.registration.authing.client-name=authing
spring.security.oauth2.client.registration.authing.client-secret={替换为你的App Secret如:931f19ce2161e5560c072f586c706ee6}
spring.security.oauth2.client.registration.authing.authorization-grant-type=authorization_code
spring.security.oauth2.client.registration.authing.client-authentication-method=POST
spring.security.oauth2.client.registration.authing.redirect-uri=http://localhost:${server.port}/login/oauth2/code/authing

spring.security.oauth2.client.registration.authing.scope=profile
spring.security.oauth2.client.provider.authing.user-info-authentication-method=form
spring.security.oauth2.client.provider.authing.authorization-uri=https://{替换为你的Issuer,如:authing-net-sdk-demo}.authing.cn/oauth/auth
spring.security.oauth2.client.provider.authing.user-name-attribute=username
spring.security.oauth2.client.provider.authing.token-uri=https://{替换为你的Issuer,如:authing-net-sdk-demo}.authing.cn/oauth/token
spring.security.oauth2.client.provider.authing.user-info-uri=https://core.authing.cn/oauth/me
Need to {clientId}、{secret}、{authorization-uri} Replace it into the previous step application configuration actual information
¶ Password mode
¶ Modify the project configuration file
Find src/main/resources/application.properties, fill in item information:
server.port=8081
spring.security.oauth2.client.registration.authing.client-id={替换为你的App ID如:App Secret5e72d72e3798fb03e1d57b13}
spring.security.oauth2.client.registration.authing.client-name=authing
spring.security.oauth2.client.registration.authing.client-secret={替换为你的App Secret如:931f19ce2161e5560c072f586c706ee6}
spring.security.oauth2.client.registration.authing.authorization-grant-type=password
spring.security.oauth2.client.registration.authing.client-authentication-method=POST
spring.security.oauth2.client.registration.authing.scope=profile
spring.security.oauth2.client.provider.authing.token-uri=https://{替换为你的Issuer,如:authing-net-sdk-demo}.authing.cn/oauth/token
Need to {clientId}、{secret}、{token-uri} Replace the actual information in the previous application configuration
¶ Business end processing

The password mode is directly exchanged with the username password.
Certification address https://{domain name}.authing.cn/oauth/token?username={username}&password={password}&grant_type=password&scope={Scope}&client_id={Client ID}&client_secret={Client key}
¶ Client mode
¶ Modify the project configuration file
Find src/main/resources/application.properties, fill in item information:
server.port=8081
spring.security.oauth2.client.registration.authing.client-id={替换为你的App ID如:App Secret5e72d72e3798fb03e1d57b13}
spring.security.oauth2.client.registration.authing.client-name=authing
spring.security.oauth2.client.registration.authing.client-secret={替换为你的App Secret如:931f19ce2161e5560c072f586c706ee6}
spring.security.oauth2.client.registration.authing.authorization-grant-type=client_credentials
spring.security.oauth2.client.registration.authing.client-authentication-method=POST
spring.security.oauth2.client.registration.authing.scope=profile
spring.security.oauth2.client.provider.authing.token-uri=https://{替换为你的Issuer,如:authing-net-sdk-demo}.authing.cn/oauth/token
Need to {clientId}、{secret}、{token-uri} replace the actual information in the previous application configuration
¶ Business end processing

Client mode and password mode Thunder, by applying ID and application secret key exchange tokens
Certification address https://{domain name}.authing.cn/oauth/token?grant_type=client_credentials&scope={Scope}&client_id={Client ID}&client_secret={Client key}
¶ Simplified mode
¶ Modify the project configuration file
Find src/main/resources/application.properties, Fill in item information:
server.port=8080
spring.security.oauth2.client.registration.authing.client-id={Replace with you App ID such as:App Secret5e72d72e3798fb03e1d57b13}
spring.security.oauth2.client.registration.authing.client-name=authing
spring.security.oauth2.client.registration.authing.client-secret={Replace with you App Secret such as:931f19ce2161e5560c072f586c706ee6}
spring.security.oauth2.client.registration.authing.authorization-grant-type=implicit
spring.security.oauth2.client.registration.authing.client-authentication-method=POST
spring.security.oauth2.client.registration.authing.redirect-uri=http://localhost:${server.port}/callback
spring.security.oauth2.client.registration.authing.scope=profile
spring.security.oauth2.client.provider.authing.token-uri=https://{Replace with you Issuer,such as:authing-net-sdk-demo}.authing.cn/oauth/token
Need to {clientId}、{secret}、{token-uri}、{redirect-uri} replace the actual information in the previous application configuration

In the simplification mode, the user directly initiates token exchange operations through the browser, without future participation
Certification address https://{domain name}.authing.cn/oauth/authorize?response_type=token&client_id={client ID}&redirect_uri={Callback address}&scope={SCOPE}&state={state}

After the authentication is authorized, the browser is redirected to the callback address and carry the access token. 
¶ sign in
¶ Create a project separately server-file,server-pic

¶ Modify the project configuration file
server-file
server.port=8081
spring.security.oauth2.client.registration.authing.client-id={Replace with you App ID such as:App Secret5e72d72e3798fb03e1d57b13}
spring.security.oauth2.client.registration.authing.client-name=authing
spring.security.oauth2.client.registration.authing.client-secret={Replace with you App Secret如:931f19ce2161e5560c072f586c706ee6}
spring.security.oauth2.client.registration.authing.authorization-grant-type=authorization_code
spring.security.oauth2.client.registration.authing.client-authentication-method=POST
spring.security.oauth2.client.registration.authing.redirect-uri=http://localhost:${server.port}/login/oauth2/code/authing

spring.security.oauth2.client.registration.authing.scope=profile
spring.security.oauth2.client.provider.authing.user-info-authentication-method=form
spring.security.oauth2.client.provider.authing.authorization-uri=https://{Replace with you Issuer,such as:authing-net-sdk-demo}.authing.cn/oauth/auth
spring.security.oauth2.client.provider.authing.user-name-attribute=username
spring.security.oauth2.client.provider.authing.token-uri=https://{Replace with you Issuer,such as:authing-net-sdk-demo}.authing.cn/oauth/token
spring.security.oauth2.client.provider.authing.user-info-uri=https://core.authing.cn/oauth/me
server-pic
server.port=8082
spring.security.oauth2.client.registration.authing.client-id={Replace with you App ID such as:App Secret5e72d72e3798fb03e1d57b13}
spring.security.oauth2.client.registration.authing.client-name=authing
spring.security.oauth2.client.registration.authing.client-secret={Replace with you App Secret such as:931f19ce2161e5560c072f586c706ee6}
spring.security.oauth2.client.registration.authing.authorization-grant-type=authorization_code
spring.security.oauth2.client.registration.authing.client-authentication-method=POST
spring.security.oauth2.client.registration.authing.redirect-uri=http://localhost:${server.port}/login/oauth2/code/authing

spring.security.oauth2.client.registration.authing.scope=profile
spring.security.oauth2.client.provider.authing.user-info-authentication-method=form
spring.security.oauth2.client.provider.authing.authorization-uri=https://{Replace with you Issuer,such as:authing-net-sdk-demo}.authing.cn/oauth/auth
spring.security.oauth2.client.provider.authing.user-name-attribute=username
spring.security.oauth2.client.provider.authing.token-uri=https://{Replace with you Issuer,such as:authing-net-sdk-demo}.authing.cn/oauth/token
spring.security.oauth2.client.provider.authing.user-info-uri=https://core.authing.cn/oauth/me
¶ Add a callback address in the Authing Console

¶ Set the project server-file protected resources

¶ Set the project server-pic protected resources

¶ Verify single sign-on effect
¶ Start the project separately server-file,server-pic


¶ Access protected resources
At this point, no matter the access server-file or the server-pic will be redirected to the Authing Authentication page.

¶ Access protected resources after login
After logging in, the resources directly accessing the server-pic do not need to be certified.

¶ Spring security-based expansion
¶ For Spring Security Configure

¶ Add project callback address

¶ Introducing Authing SDK for customization
 <dependency>
    <groupId>cn.authing</groupId>
    <artifactId>java-core</artifactId>
    <version>{LATEST_VERSION}</version>
</dependency>

¶ Next you may need
Use Spring Security integrated OIDC
Spring Security integrated Authing OIDC Start quicklyExpress Learn
Express integrated OIDC Single sign-in guideUse Spring Security integrated CAS
Spring Security integrated Authing CAS Start quickly