Authing DocsDocuments
Concept
Guides
Development Integration
Application integration
Concept
Guides
Development Integration
Application integration
Old Version
Guides
  • Quick start

    • Authenticate your first user

      • Use the hosted login page to complete the authentication
      • Use the embedded login component to complete the authentication
      • Use API & SDK to complete authentication
      • Verify user credentials (token)
      • Authority management for users
      • Realize logout
      • Next you may need
    • Access methods for different types of applications

      • Integrate Authing in traditional Web App
      • Integrate in Single Page Application (SPA) Authing
      • Integrate in mobile terminal (iOS, Andriod) Authing
    • Console overview
  • Authenticate the user

    • Use account password authentication
    • Use SMS verification code authentication
    • Use social login authentication
    • Use scan code login authentication

      • Use self-built App to scan the code to log in to the website

        • Complete interface list
        • Custom configuration items
      • Use the mini program to scan the code to log in to the website
    • Certify in Mini Program
    • Implement single sign-on (SSO)
    • Single sign-on on the mobile terminal
    • Multi-factor authentication (MFA)

      • MFA of one-time password (TOTP) based on timestamp algorithm
      • MFA based on SMS verification code
      • MFA based on email verification code
      • Access MFA through SDK
    • Extend the authentication process

      • Add user-defined fields
      • IdToken add custom field
      • Use a custom database to authenticate users
      • Use Pipeline to extend the authentication process
      • Use Webhook to monitor authentication events
    • Personalize the guard
  • Authority management for users

    • Choose the appropriate permission model
    • Integrate RBAC permission model into your application system
    • Integrate ABAC permission model into your application system
    • Use permission group management permission resources
    • Manage resource permissions
  • Authorization

    • Inter-application authorization for user permission
    • M2M authorization
  • Manage user accounts

    • User field interpretation
    • Administrator create account
    • Manage user accounts
    • Binding account
    • Manage user's custom data
    • View user's login history
    • View the user's geographic location
    • Enhance account security
    • Manage user login status
    • Control which applications users can access
    • User groups
  • Manage User Directory

    • User Directory Configuration Item
    • Add custom user field
    • Search users
    • Use LDAP user directory
  • Management Application

    • Create Application
    • Configure login and registration method
    • Add registration agreement
    • Customize login box style
    • Become a source of federal authentication identity
    • Enable multi-factor authentication
    • Sub-account management
    • Implement single sign-on between applications
    • Manage user login status
  • Become a source of federal authentication identity

    • Become an OpenID Connect Identity Source
    • Become OAuth2.0 Identity Source
    • Become a SAML2 identity source
    • Become a CAS Identity Source
  • Connect to an external identity provider (IdP)

    • Social Identity Provider

      • WeChat QR Code on PC
      • Mini Program QR Code on PC
      • WeChat Official Accounts QR Code
      • Mobile App Use WeChat Login
      • Mobile App Use WeChat Mini Program Login
      • WeChat Web Page
      • WeChat Mini Program
      • Tencent QQ
      • Sina Weibo
      • GitHub
      • Facebook
      • Twitter
      • Google
      • Apple Mobile
      • Apple Web
      • Alipay
      • Slack
      • Gitee
      • GitLab
      • Baidu
      • NetEase YIDUN
      • QingCloud
      • Instagram
      • LinkedIn
    • Enterprise Identity Provider

      • WeCom Self-built App QR Code
      • WeCom Self-built App QR Code Login(Delegated Development Mode)
      • WeCom Service Provider App QR Code
      • WeCom Mobile
      • DingTalk H5 Micro Application (Internal Development)
      • Feishu Marketplace App
      • Feishu Custom App
      • Windows AD
      • Azure AD
      • OIDC
      • OAuth 2.0
      • LDAP
      • SAML
      • CAS
      • WeLink
    • Custom database

      • Configure database connection and scripting
      • Lazy migration of users to Authing
      • Fully use a custom database to save user data
      • Best Practice
  • Open up WeChat ecology
  • Migrate users to Authing

    • Use SDK to import users
    • Configure custom password function
    • Import users from corporate WeChat, DingTalk and other third-party identity sources
  • Management organization

    • Create or import an organization
    • Management organization
    • Manage member life cycle
    • Use LDAP protocol to open organization data to the outside world
  • Expandable capabilities

    • Use Webhook to monitor user events
    • Custom authentication process (Pipeline)

      • Create your first Pipeline function
      • Pipeline API Reference
      • Pipeline application scenario
      • Pipeline User Object
      • Pipeline Context Object
      • Use environment variables in Pipeline
      • Available Node Modules
      • How to debug
      • FAQ
      • Private deployment
    • Configure custom password function
  • Audit Log

    • Audit of user behavior
    • Audit of Administrator Behavior
  • Configure security information

    • Configure Web Security Domain
    • Configure password strength
    • Configure registration frequency limit
    • Configure the limit on the number of failed login attempts
  • Configure user pool information

    • Modify user pool basic information
    • Configure mail service and template
    • Configure SMS service and template
    • Add user pool collaboration administrator
    • Developer Configuration
  • Deployment plan

    • Basic deployment mode
    • Docker deployment mode
    • Kubernetes deployment mode
    • Custom Domain Name Configuration Scheme
  • Frequently Asked Questions FAQs

    • How to get user pool ID
    • How to get the application ID
    • How to verify user credentials (token)
    • Join table Authing in the local user and your business data
    • Impact of disabling third-party cookies on Authing
    • How to deploy a transit proxy server
  1. Guides
  2. /
  3. Quick start

  4. /
  5. Authenticate your first user
  6. /
  7. Use the embedded login component to complete the authentication

¶ Use embeded login component to authenticate

Update Time: 2022-05-14 10:21:54
Edit

The embedded login component (Guard) is considered to be the best balance between flexibility and integration.If the integration requires a deeper level of customization or the hosting mode cannot be used in some scenarios where the front end and back end are separated, it is recommended to use this mode.The embedded login component is built and updated by Authing, using the best practice security design in industry. Only a few lines of JavaScript code is needed and then it can be integrated into your development project.

You can click here to understand the difference between the Authing hosted login page (Hosted) and the embedded login component (Embedded).

¶ Embedded login component introduction

The following functions are integrated in the Authing embedded login component:

  • Login: including account password login (including mobile phone number + password, email + password, username + password) and SMS code login.
  • Registration: including mobile phone SMS code registration, and username and password registration.
  • Social login, such as GitHub login (need to be configured in the background first).
  • APP QR code login (need to access APP scan code login first).
  • Mini Program QR code login (need to be configured in the background).
  • Enterprise identity source login (need to configure enterprise identity source).
  • Forget password and reset password.
  • MFA validation.

It has the following features:

  • Lightweight: All resources are packaged in only a few hundred KB.
  • Responsive: compatible with mobile and PC web pages.
  • Customization: It can support a complete UI customization function.

¶ Integrate with different front-end frameworks

Framework
React
Loading...

¶ Install

It is recommended to use create-react-app to initialize a React project

npx create-react-app first-authing-app --template typescript

And then, install @authing/react-ui-components SDK:

yarn add @authing/react-ui-components

Or:

npm install @authing/react-ui-components --save

¶ Initialize

You need to import AuthingGuard from @authing/react-ui-components. Initializing AuthingGuard requires only one parameter-your application ID (appId). You can get the appId of the application on the application list page of the console.

import { AuthingGuard } from "@authing/react-ui-components";
import "@authing/react-ui-components/lib/index.min.css";

function App() {
  return (
    <div className="App">
      <AuthingGuard appId="authing_APP_ID" />
    </div>
  );
}

Authing Guard will automatically pull the configuration of the application, such as name, logo, etc., from the server.Refresh the page and an embedded login form is displayed:

Next, let's monitor user login events, and obtain user information after the user logs in successfully.

¶ Monitor login success event

It is simple. You only need to pass a callback onLogin.

function App() {
  return (
    <div className="App">
      <AuthingGuard
        appId="authing_APP_ID"
        onLogin={userinfo => {
          console.log(userinfo);
        }}
      />
    </div>
  );
}

Here we can use console.log to show user information:

The token field in user information is the identity credential. In the following steps, you need to carry it in requests when you want to access back-end resources. The back end will verify this token.

¶ Validate user token in back-end

The token field of the user information is a standard OIDC IdToken. You can use the application ID and Secret to verify this token on the backend.

An example of token:

eyJhbGciOiJIUzI1NiIsInR5cCI6IkpXVCJ9.eyJzdWIiOiI1ZjIxNTFiZWFlNWE4YjRjZTZiMGJhZTkiLCJiaXJ0aGRhdGUiOiIiLCJmYW1pbHlfbmFtZSI6IiIsImdlbmRlciI6IiIsImdpdmVuX25hbWUiOiIiLCJsb2NhbGUiOiIiLCJtaWRkbGVfbmFtZSI6IiIsIm5hbWUiOiIiLCJuaWNrbmFtZSI6IiIsInBpY3R1cmUiOiJodHRwczovL3VzZXJjb250ZW50cy5hdXRoaW5nLmNuL2F1dGhpbmctYXZhdGFyLnBuZyIsInByZWZlcnJlZF91c2VybmFtZSI6InRlc3RAZXhhbXBsZS5jb20iLCJwcm9maWxlIjoiIiwidXBkYXRlZF9hdCI6IjIwMjEtMDEtMThUMDc6NDg6NTUuNzgxWiIsIndlYnNpdGUiOiIiLCJ6b25laW5mbyI6IiIsImFkZHJlc3MiOnsiY291bnRyeSI6IiIsInBvc3RhbF9jb2RlIjoiIiwicmVnaW9uIjoiIiwiZm9ybWF0dGVkIjoiIn0sInBob25lX251bWJlciI6bnVsbCwicGhvbmVfbnVtYmVyX3ZlcmlmaWVkIjpmYWxzZSwiZW1haWwiOiJ0ZXN0QGV4YW1wbGUuY29tIiwiZW1haWxfdmVyaWZpZWQiOmZhbHNlLCJkYXRhIjp7InR5cGUiOiJ1c2VyIiwidXNlclBvb2xJZCI6IjVhOWZhMjZjZjg2MzVhMDAwMTg1NTI4YyIsImFwcElkIjoiNjAwNTNiNzQxNjQ3OGRlMmU4OGZhYjQzIiwiaWQiOiI1ZjIxNTFiZWFlNWE4YjRjZTZiMGJhZTkiLCJ1c2VySWQiOiI1ZjIxNTFiZWFlNWE4YjRjZTZiMGJhZTkiLCJfaWQiOiI1ZjIxNTFiZWFlNWE4YjRjZTZiMGJhZTkiLCJwaG9uZSI6bnVsbCwiZW1haWwiOiJ0ZXN0QGV4YW1wbGUuY29tIiwidXNlcm5hbWUiOiJ0ZXN0QGV4YW1wbGUuY29tIiwidW5pb25pZCI6bnVsbCwib3BlbmlkIjpudWxsLCJjbGllbnRJZCI6IjVhOWZhMjZjZjg2MzVhMDAwMTg1NTI4YyJ9LCJ1c2VycG9vbF9pZCI6IjVhOWZhMjZjZjg2MzVhMDAwMTg1NTI4YyIsImF1ZCI6IjYwMDUzYjc0MTY0NzhkZTJlODhmYWI0MyIsImV4cCI6MTYxMjE2NTg4OCwiaWF0IjoxNjEwOTU2Mjg4LCJpc3MiOiJodHRwczovL3NhbXBsZS1hcHAuYXV0aGluZy5jbi9vaWRjIn0.SNyGBffF-zBqDQFINGxUJZrWSAADHQhbEOsKvnH4SLg

You can decode the IdToken in this website (opens new window):

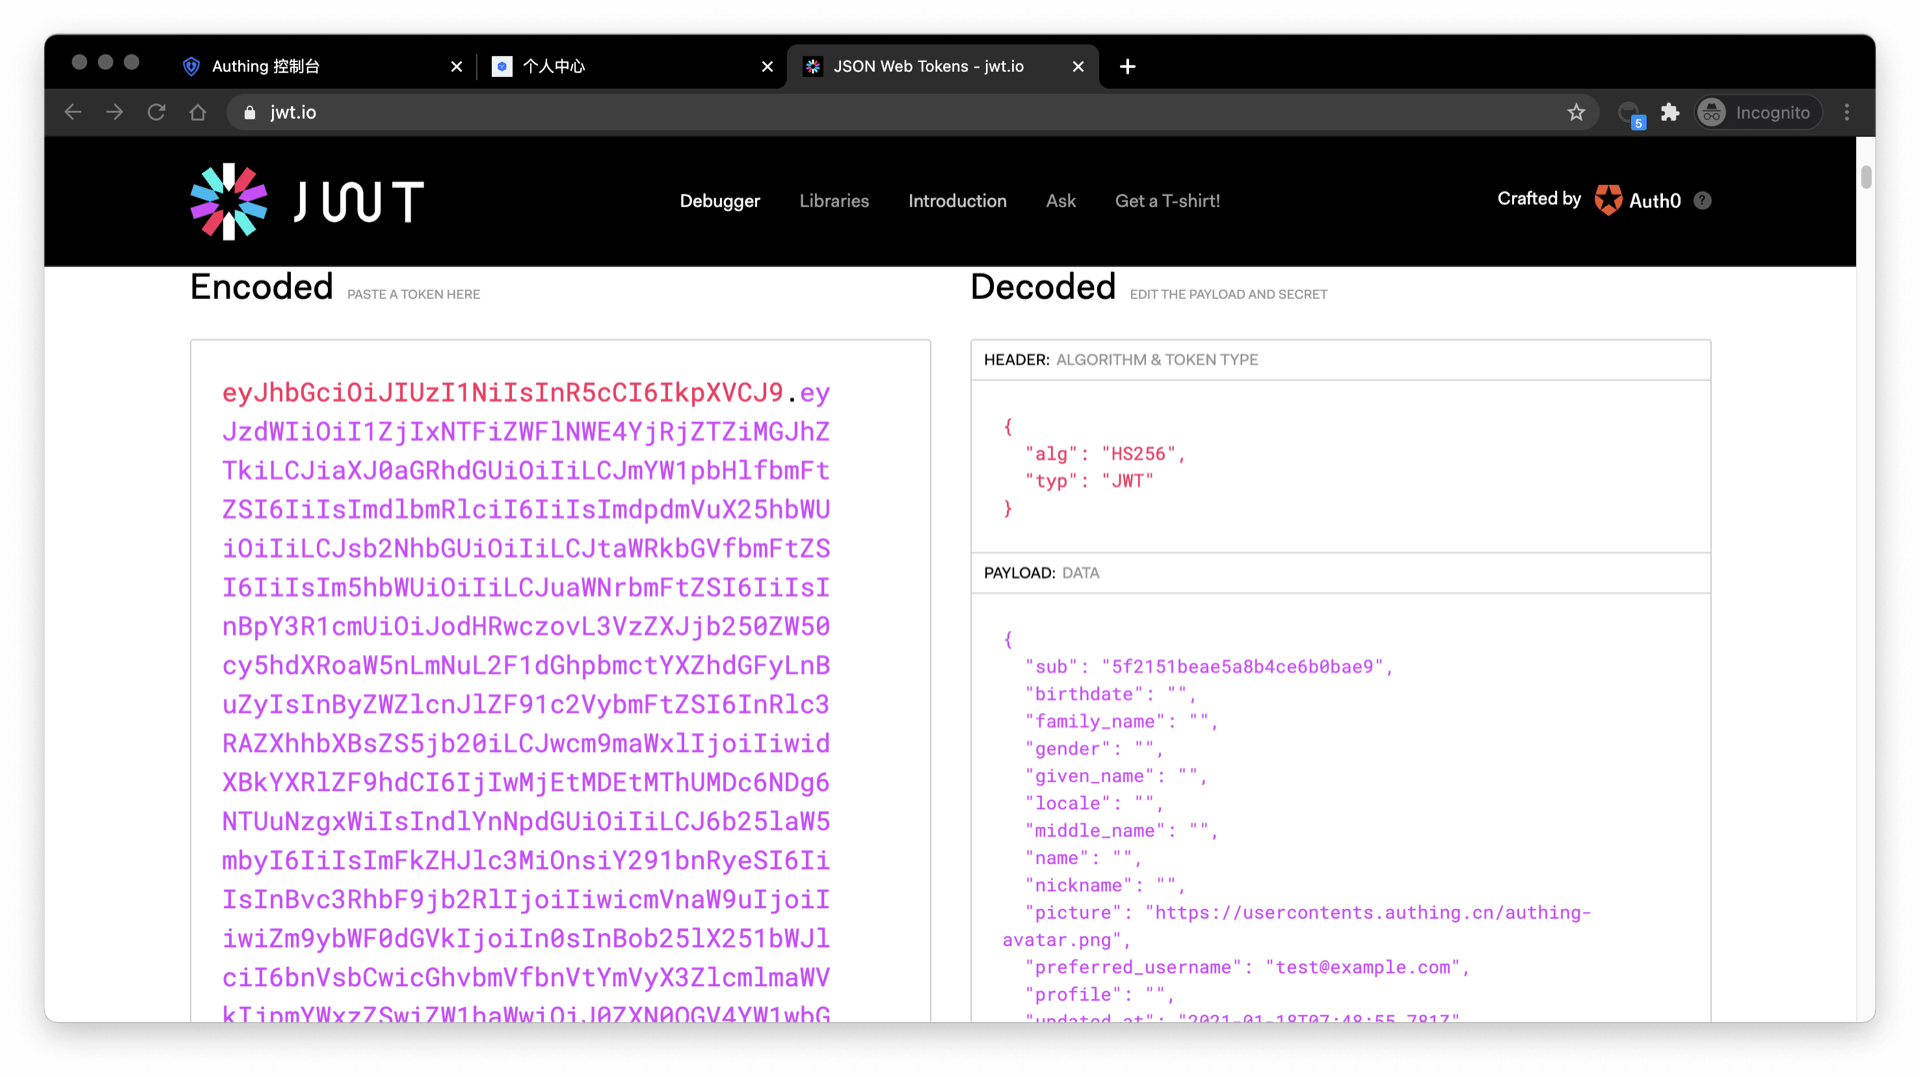
The sub field is the ID of the user, and the aud field is the ID of the application. You can learn the detailed definition of each field of OIDC IdToken through this article (opens new window).

Basically all languages provide libraries for validating IdToken. Take Node.js as an example, you can use JSON Web Token (opens new window) to verify IdToken.

const jwt = require("jsonwebtoken");

try {
  const data = jwt.verify("YOUR_ID_TOKEN", "YOUR_APP_SECRET");
} catch (error) {
  // token might be invalid or expired
  console.error(error);
}

If the validation is successful, you can get the unique ID of the user through the sub field, and then you can combine the user ID with your own business logic code. If you need to assign different roles and privileges to different users, you can learn how to assign roles and privileges to users for fine-grained permission control.

¶ Detailed parameter and event list

The Authing embedded login component is highly customizable. The Authing embedded login component supports highly customizable.In addition to customizing the basic configuration such as the title and Logo, you can also control the visibility of the login method, fully customize the style through custom CSS, and so on. In addition to successful login events, the Authing embedded login component also encapsulates events such as successful registration, login failure, and login registration mode switching. For detailed documentation, please refer to the Guard document.

Prev: Use the hosted login page to complete the authentication Next: Use API & SDK to complete authentication
  • Embedded login component introduction
  • Integrate with different front-end frameworks
  • Validate user token in back-end
  • Detailed parameter and event list

User identity management

Integrated third-party login
Mobile phone number flash check (opens new window)
Universal login form component
Custom authentication process

Enterprise internal management

Single Sign On
Multi-factor Authentication
Authority Management

Developers

Development Document
Framework Integration
Blog (opens new window)
GitHub (opens new window)
Community User Center (opens new window)

Company

400 888 2106
sales@authing.cn
16 / F, Block B, NORTH STAR CENTURY CENTER, Beijing(Total)
room 406, 4th floor, zone B, building 1, No. 200, Tianfu Fifth Street, Chengdu(branch)

Beijing ICP No.19051205-1

© Beijing Steamory Technology Co.