¶ 将 Guard 接入到 Angular 项目
Guard 是 Authing 提供的一种轻便的认证组件,你可以把它嵌入在你任何的单页 Web 应用中,一站式处理复杂的用户认证流程。
准备好你的 Angular 项目,跟随引导将 Authing Guard 接入到你的 Angular 项目中吧!
¶ 开始前的准备
npm:@authing/ng-ui-components (opens new window)
Angular 版本:Angular 10/11/12/13
¶ STEP 1: 在 Authing 控制台创建应用
首先,你需要将你的应用接入 Authing 控制台。如果你还没有创建,请先在 Authing 控制台创建一个应用。
在 Authing 控制台左侧导航进入「自建应用」功能区,点击右上角的创建自建应用按钮,填入以下信息:
- 应用名称: 你的应用名称;
- 认证地址: 选择一个二级域名,必须为合法的域名格式,例如
my-awesome-app;
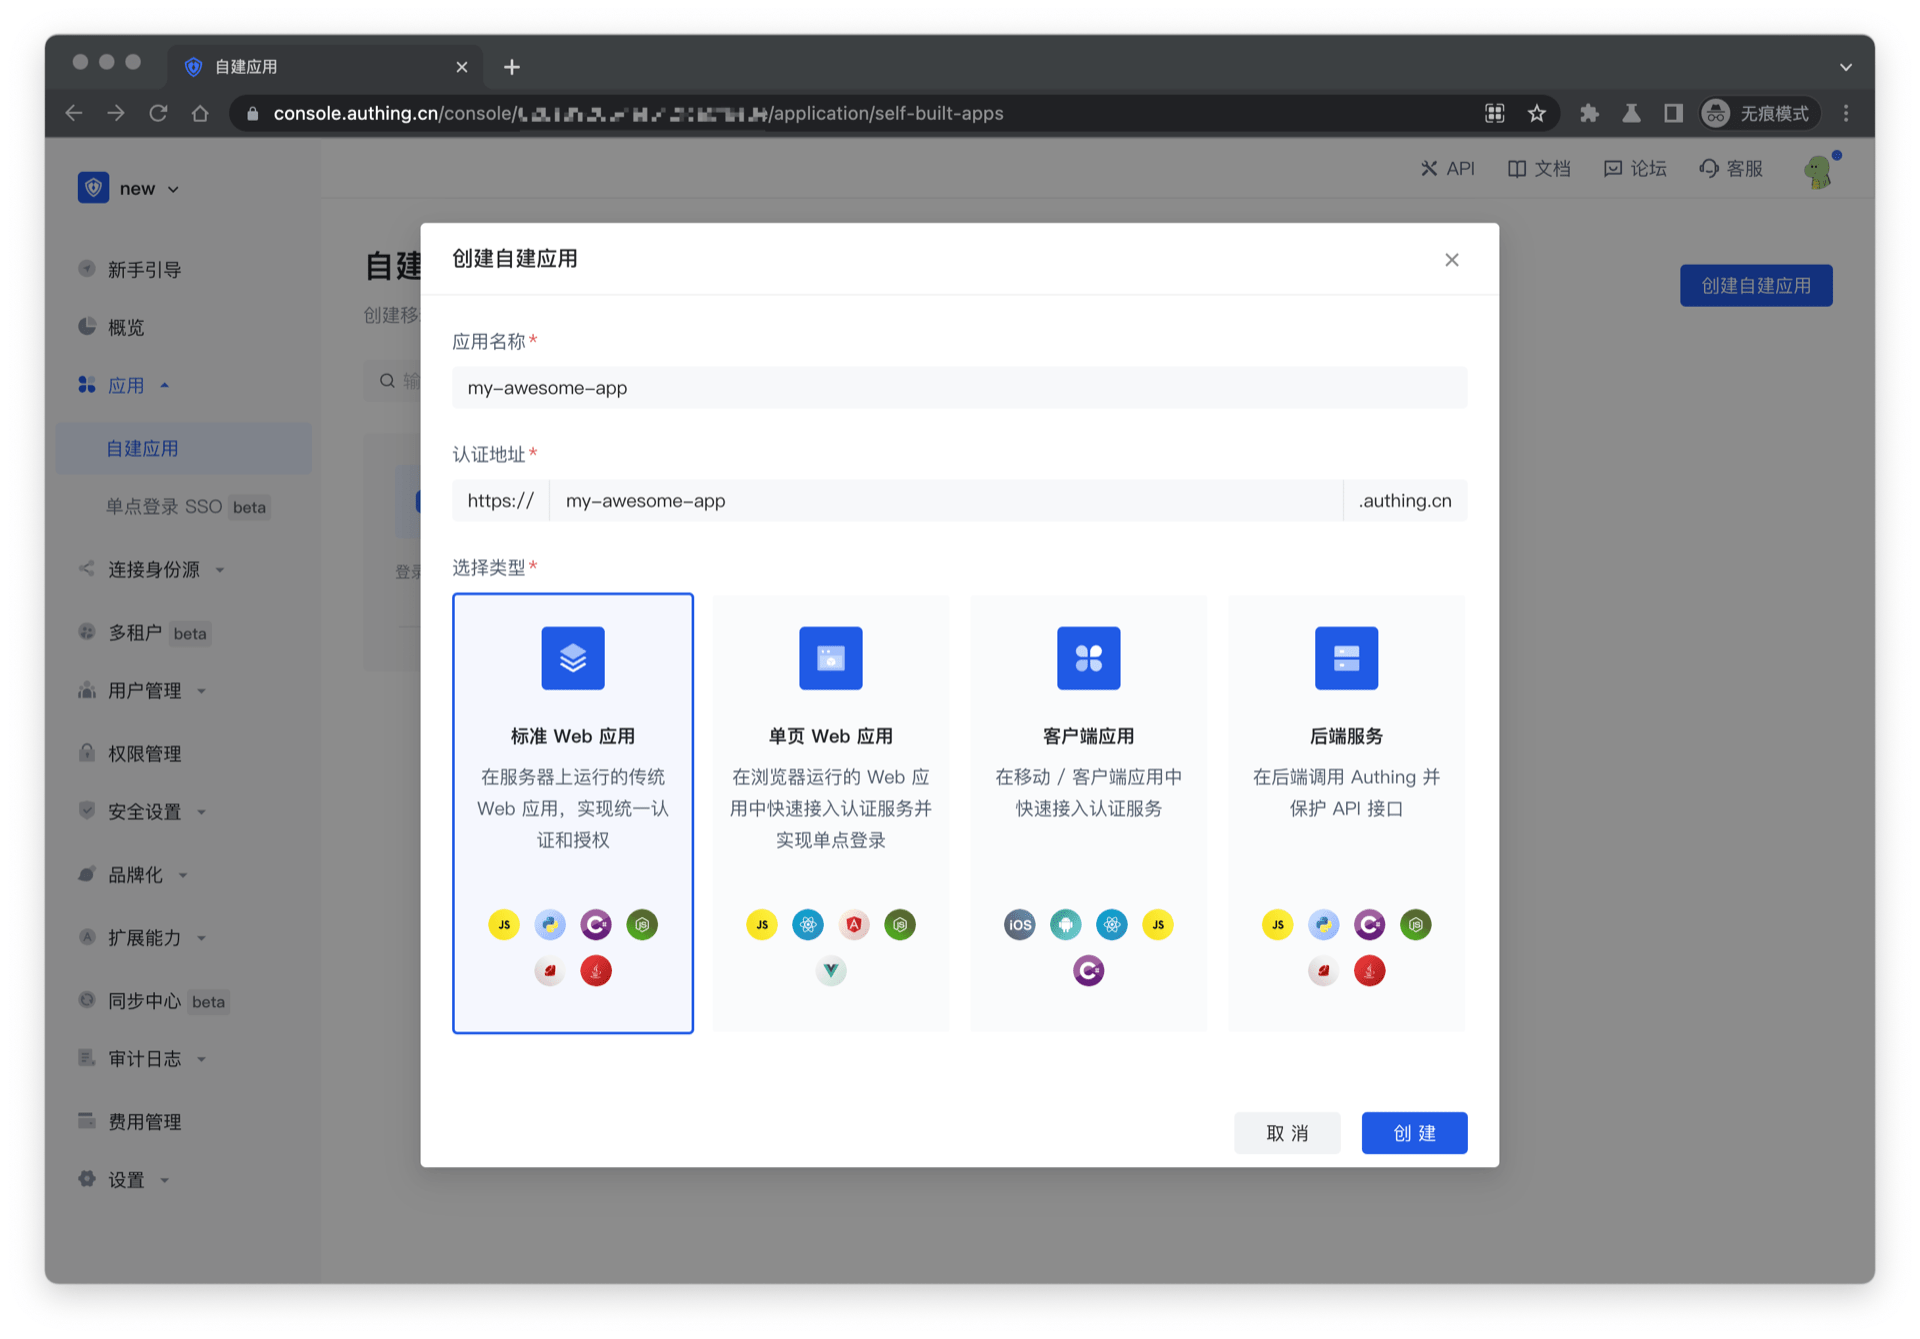
创建完成!接下来你将正式开始 Authing Guard (Angular) 的接入和配置。
¶ STEP 2: 安装和初始化
在使用之前需要用到应用的 appid ,请先前往控制台获取。
¶ 安装 Authing library
首先,通过 npm/yarn/cnpm 安装 Authing library.
推荐使用 npm (稳定版本 v3.1.21)或 yarn,它们能更好的和 webpack (opens new window) 打包工具进行配合,也可放心地在生产环境打包部署使用,享受整个生态圈和工具链带来的诸多好处。 如果你的网络环境不佳,也可使用 cnpm (opens new window) 。
运行下列命令行安装 Authing Angular.JS library:
$ yarn add @authing/ng-ui-components

# OR

$ npm install @authing/ng-ui-components --save
接下来,在你的 Angular 应用中完成配置:
首先你需要在项目的 tsconfig.json 里面的 compilerOptions 添加:
"skipLibCheck": true
在 Angular 项目中初始化:
app.module.ts
import { NgModule } from "@angular/core";
import { BrowserModule } from "@angular/platform-browser";

import { AppRoutingModule } from "./app-routing.module";
import { AppComponent } from "./app.component";

import { GuardModule } from "@authing/ng-ui-components";

@NgModule({
  declarations: [AppComponent],
  imports: [BrowserModule, AppRoutingModule, GuardModule],
  providers: [],
  bootstrap: [AppComponent],
})
export class AppModule {}
app.component.ts
import { Component } from "@angular/core";
import { User, AuthenticationClient } from "@authing/ng-ui-components";
@Component({
  selector: "app-root",
  templateUrl: "./app.component.html",
})
export class AppComponent {
  // 替换你的 AppId
  appId = "your_appId_at_authing_console";

  onLogin([user]: [User, AuthenticationClient]): void {
    console.log(user);
  }
}
app.component.html
<guard [appId]="appId" (onLogin)="onLogin($event)"></guard>
¶ STPE 3: 常用操作
我们为你整理了所有在配置 Guard 时常用的操作和代码示例,你可以直接点击跳到相应位置:
- 登录并获取用户信息
- 判断用户登录状态
- 退出登录
- 用户注册
- 第三方身份源登录
- 实现单点登录
- 多语言能力
- 自定义样式
- 使用弹窗形式的登录框
- 使用 AuthClient 管理用户登录态
- 私有化部署
- 高级功能(以刷新 Token 为例)
¶ 1. 登录并获取用户信息
用户在登录成功后会触发 onLogin 事件,并且在事件中会返回用户的详细信息。onLogin 具体的使用方法如下:
app.component.ts
import { Component } from "@angular/core";
import { User, AuthenticationClient } from "@authing/ng-ui-components";
@Component({
  selector: "app-root",
  templateUrl: "./app.component.html",
})
export class AppComponent {
  // 替换你的 AppId
  appId = "your_appId_at_authing_console";

  onLogin([user]: [User, AuthenticationClient]): void {
    console.log(user);
  }
}
app.component.html
<guard [appId]="appId" (onLogin)="onLogin($event)"></guard>
¶ 2. 判断用户登录状态
用户登录成功后,在二次会话的时候,我们之前已经将 token 进行了缓存。在判断用户登录状态时,首先需要对这个 token 进行登录状态校验,校验成功后在进行用户详细信息的获取。
你可以使用 authClient 中的 checkLoginStatus 方法检测 token 登录状态。下方代码是优先检测登录态,如果用户处于登录态,则显示用户的头像。
app.component.ts
import { Component } from "@angular/core";
import { User, GuardMode } from "@authing/ng-ui-components";
import { AuthenticationClient } from "authing-js-sdk";

@Component({
  selector: "app-root",
  templateUrl: "./app.component.html",
  // 注意此位置添加了 CSS,添加了 CSS 会有更好的展示效果,直接复制下方的 app.component.css 即可
  // styleUrls: ['./app.component.css'],
})
export class AppComponent {
  // 替换你的 AppId
  appId = "your_appId_at_authing_console";

  authClient = new AuthenticationClient({
    appId: this.appId,
  });

  config = {
    mode: GuardMode.Modal,
  };

  visible = false;

  user: User | null = null;

  showGuard(): void {
    this.visible = true;
  }

  onClose(): void {
    this.visible = false;
  }

  ngAfterViewInit() {
    this.checkLoginStatus();
  }

  async checkLoginStatus() {
    // authClient 登录成功时 会将用户相关信息存储在 localStorage 中
    const currentUser = await this.authClient.getCurrentUser();

    const token = currentUser?.token;

    if (!token) return;

    // 检查当前用户是否有登录态
    const { status } = await this.authClient.checkLoginStatus(token);

    if (status) {
      this.user = currentUser;
    }
  }

  async onLogout(): Promise<void> {
    const user = await this.authClient.getCurrentUser();

    if (!user) {
      alert("你还没有登录,请先登录!");
    }

    await this.authClient.logout();

    alert("登出成功!");

    this.user = null;
  }

  onLogin([user]: [User, any]): void {
    this.visible = false;

    this.user = user;
  }
}
app.component.html
<div *ngIf="user" class="user-info">
  <p class="label">用户名:<span>{{user?.username}}</span></p>
  <p class="label">手机号:<span>{{user?.phone}}</span></p>
  <p class="label">邮箱:<span>{{user?.phone}}</span></p>
  <p class="label">token:<span>{{user?.token}}</span></p>
</div>
<button (click)="showGuard()">登录</button>
<guard
  [authClient]="authClient"
  [visible]="visible"
  [config]="config"
  (onClose)="onClose"
></guard>
app.component.css
.user-info {
    width: 500px;
    height: 400px;
    position: relative;
    overflow: auto;
    word-wrap:break-word;
    padding: 15px;
    margin: 15px;
    box-shadow: 0 0 60px rgba(46, 48, 53, 0.05);
}
.label {
    font-size: 20px;
    font-weight: bold;
    color: #000;
}
button {
    margin: 15px;
    background: #396aff;
    border: 0px;
    width: 150px;
    height: 40px;
    border-radius: 5px;
    color: #fff;
}
¶ 3. 退出登录
你可以使用 authClient 中的 logout 方法完成退出登录的操作:
app.component.ts
import { Component } from "@angular/core";
import { User, GuardMode } from "@authing/ng-ui-components";
import { AuthenticationClient } from "authing-js-sdk";
@Component({
  selector: "app-root",
  templateUrl: "./app.component.html",
  // 注意此位置添加了 CSS,添加了 CSS 会有更好的展示效果,直接复制下方的 app.component.css 即可
  // styleUrls: ['./app.component.css'],
})
export class AppComponent {
  // 替换你的 AppId
  appId = "your_appId_at_authing_console";

  authClient = new AuthenticationClient({
    appId: this.appId,
  });

  config = {
    mode: GuardMode.Modal,
  };

  visible = false;

  user: User | null = null;

  showGuard(): void {
    this.visible = true;
  }

  onClose(): void {
    this.visible = false;
  }

  ngAfterViewInit() {
    this.checkLoginStatus();
  }

  async checkLoginStatus() {
    // authClient 登录成功时 会将用户相关信息存储在 localStorage 中
    const currentUser = await this.authClient.getCurrentUser();

    const token = currentUser?.token;

    if (!token) return;

    // 检查当前用户是否有登录态
    const { status } = await this.authClient.checkLoginStatus(token);

    if (status) {
      this.user = currentUser;
    }
  }

  async onLogout(): Promise<void> {
    const user = await this.authClient.getCurrentUser();

    if (!user) {
      alert("你还没有登录,请先登录!");
    }

    await this.authClient.logout();

    alert("登出成功!");

    this.user = null;
  }

  onLogin([user]: [User, an]): void {
    this.visible = false;

    this.user = user;
  }
}
app.component.html
<div *ngIf="user" class="user-info">
  <p class="label">用户名:<span>{{ user?.username }}</span></p>
  <p class="label">手机号:<span>{{ user?.phone }}</span></p>
  <p class="label">邮箱:<span>{{ user?.phone }}</span></p>
  <p class="label">token:<span>{{ user?.token }}</span></p>
</div>
<button (click)="showGuard()">登录</button>
<button (click)="onLogout()">退出登录</button>
<guard
  [visible]="visible"
  [appId]="appId"
  [config]="config"
  (onClose)="(onClose)"
></guard>
app.component.css
.user-info {
    width: 500px;
    height: 400px;
    position: relative;
    overflow: auto;
    word-wrap:break-word;
    padding: 15px;
    margin: 15px;
    box-shadow: 0 0 60px rgba(46, 48, 53, 0.05);
}
.label {
    font-size: 20px;
    font-weight: bold;
    color: #000;
}
button {
    margin: 15px;
    background: #396aff;
    border: 0px;
    width: 150px;
    height: 40px;
    border-radius: 5px;
    color: #fff;
}
¶ 4. 用户注册
Guard 初始化参数 config 字段,主要用于控制 Guard 具体渲染的配置。可以在 config 中传入 defaultScenes 字段,来控制 Guard 渲染的默认场景。如果只使用注册场景的话,传入 GuardModuleType.REGISTER 即可。具体的使用方法如下:
app.component.ts
import { Component } from "@angular/core";
import {
  User,
  GuardScenes,
  AuthenticationClient,
} from "@authing/ng-ui-components";
@Component({
  selector: "app-root",
  templateUrl: "./app.component.html",
})
export class AppComponent {
  // 替换你的 AppId
  appId = "your_appId_at_authing_console";

  config = {
    defaultScenes: GuardScenes.Register,
  };
  onRegister([user]: [User, AuthenticationClient]) {
    console.log(user);
  }
}
app.component.html
<guard
  [appId]="appId"
  [config]="config"
  (onRegister)="onRegister($event)"
></guard>
¶ 5. 第三方身份源登录
Authing 目前支持 20+ 种第三方身份源登录方式,基本囊括所有常用的身份源:
社会化身份源: Google、GitHub、微信、QQ、微博、 飞书、企业微信、钉钉、AD、Azure AD...
基于认证协议的身份服务: OIDC、OAuth2.0、SAML、CAS...
你可以点击上面的链接查看 Authing 支持的所有第三方身份源,并根据你的实际需要进行选择。选好你需要使用的身份源后,请根据下面的引导完成接入。
首先,你需要根据在 Authing 控制台完成你所需的身份源的配置。
然后,使用下面的方法来控制配置完成的身份源的展示与隐藏。
此处以 Github 身份源为例:
app.components.ts
import { Component } from "@angular/core";
import { User, AuthenticationClient } from "@authing/ng-ui-components";
import { SocialConnectionProvider } from "authing-js-sdk";
@Component({
  selector: "app-root",
  templateUrl: "./app.component.html",
})
export class AppComponent {
  // 替换你的 AppId
  appId = "your_appId_at_authing_console";

  config = {
    socialConnections: [SocialConnectionProvider.GITHUB],
  };

  onLogin([user]: [User, AuthenticationClient]): void {
    console.log(user);
  }
}
<guard [appId]="appId" [config]="config" (onLogin)="onLogin($event)"></guard>
¶ 6. 实现单点登录
为你的 Guard 设置 isSSO 参数,让用户能够在所有接入 Authing 的应用之间单点登录,即:一次登录,即可使用所有应用。具体实现方法如下:
app.component.ts
import { Component } from "@angular/core";
import { User, AuthenticationClient } from "@authing/ng-ui-components";
@Component({
  selector: "app-root",
  templateUrl: "./app.component.html",
})
export class AppComponent {
  // 替换你的 AppId
  appId = "your_appId_at_authing_console";

  config = {
    isSSO: true,
  };

  onLogin([user]: [User, AuthenticationClient]): void {
    console.log(user);
  }
}
app.component.html
<guard [appId]="appId" [config]="config" (onLogin)="onLogin($event)"></guard>
¶ 7. 多语言能力
你可以通过下面的方法为 Guard 增加「切换语言」按钮,目前支持中/英切换。如果你的 Guard 并未配置「切换语言」按钮,界面语言将会默认采用浏览器语言。特别的,如果用户的浏览器语言并非中/英,Guard 界面将会展示为中文。
app.component.ts
import { Component } from "@angular/core";
import {
  User,
  AuthenticationClient,
  GuardMode,
} from "@authing/ng-ui-components";

@Component({
  selector: "app-root",
  templateUrl: "./app.component.html",
})
export class AppComponent {
  // 替换你的 AppId
  appId = "your_appId_at_authing_console";

  lang = "zh-CN";

  config = {
    lang: "zh-CN",
  };

  onLangChange([lang]: [string]): void {
    this.lang = lang;
  }

  onLogin([user]: [User, AuthenticationClient]): void {
    console.log(user);
  }
}
app.component.html
<p>{{lang === 'zh-CN' ? "中文" : "英文"}}</p>
<guard
  [appId]="appId"
  [config]="config"
  (onLogin)="onLogin($event)"
  (onLangChange)="onLangChange($event)"
></guard>
¶ 8. 自定义样式
Guard 默认水平垂直居中,你可以通过编写 CSS 代码注入到 Guard,原理是改变 config 中的 contentCss 属性,以此实现更个性化的登录框样式。
在这里以 「隐藏应用 Logo」为例:
app.component.ts
import { Component } from "@angular/core";
import { User, AuthenticationClient } from "@authing/ng-ui-components";

@Component({
  selector: "app-root",
  templateUrl: "./app.component.html",
})
export class AppComponent {
  // 替换你的 AppId
  appId = "your_appId_at_authing_console";

  config = {
    contentCss: ".g2-view-header > img { display: none; }",
  };

  onLogin([user]: [User, AuthenticationClient]): void {
    console.log(user);
  }
}
app.component.html
<guard [appId]="appId" [config]="config" (onLogin)="onLogin($event)"></guard>
¶ 9. 使用弹窗形式的登录框
Authing 提供的默认的 Guard 是独立页面。如果你需要使用弹窗形式的登录框,请参考下面的代码示例:
app.component.ts
import { Component } from "@angular/core";
import {
  User,
  AuthenticationClient,
  GuardMode,
} from "@authing/ng-ui-components";

@Component({
  selector: "app-root",
  templateUrl: "./app.component.html",
})
export class AppComponent {
  // 替换你的 AppId
  appId = "your_appId_at_authing_console";

  config = {
    mode: GuardMode.Modal,
  };

  visible = false;

  showGuard(): void {
    this.visible = true;
  }

  onClose(): void {
    this.visible = false;
  }

  onLogin([user]: [User, AuthenticationClient]): void {
    console.log(user);
  }
}
app.component.html
<p>弹窗状态:{{visible ? "显示" : "隐藏"}}</p>
<button (click)="showGuard()">显示登录弹窗</button>
<guard
  [appId]="appId"
  [config]="config"
  [visible]="visible"
  (onLogin)="onLogin($event)"
  (onClose)="onClose()"
></guard>
app.component.css
.user-info {
  width: 500px;
  height: 400px;
  position: relative;
  overflow: auto;
  word-wrap: break-word;
  padding: 15px;
  margin: 15px;
  box-shadow: 0 0 60px rgba(46, 48, 53, 0.05);
}
.label {
  font-size: 20px;
  font-weight: bold;
  color: #000;
}
button {
  margin: 15px;
  background: #396aff;
  border: 0px;
  width: 150px;
  height: 40px;
  border-radius: 5px;
  color: #fff;
}
¶ 10. 使用 AuthClient 管理用户登录态
AuthClient 可以帮助你更加方便的管理已经登录成功的用户,比如判断 用户登录状态、退出登录、刷新用户 Token 等。在使用 AuthClient 管理用户登录态时, 你在初始化时可以不用传入 appId。
在使用 Guard 组件时,通过 Props 传入初始化完成的 AuthClient,使用需要你单独进行维护。
代码示例如下:
app.component.ts
import { Component } from "@angular/core";
import { User } from "@authing/ng-ui-components";
import { AuthenticationClient } from "authing-js-sdk";
@Component({
  selector: "app-root",
  templateUrl: "./app.component.html",
})
export class AppComponent {
  authClient = new AuthenticationClient({
    // 替换你的 AppId
    appId: "your_appId_at_authing_console",
  });

  async onLogout(): Promise<void> {
    const user = await this.authClient.getCurrentUser();

    if (!user) {
      alert("你还没有登录,请先登录!");
    }

    await this.authClient.logout();

    alert("登出成功!");
  }

  onLogin([user]: [User, AuthenticationClient]): void {
    console.log(user);
  }
}
app.component.html
<button (click)="onLogout()">退出登录</button>
<guard [authClient]="authClient"></guard>
¶ 11. 私有化部署
如果你是通过「私有化部署」的方式使用 Authing 服务,需要指定你私有化的端点(不带 Path),具体方式如下:
app.component.ts
import { Component } from "@angular/core";
import { User, AuthenticationClient } from "@authing/ng-ui-components";

@Component({
  selector: "app-root",
  templateUrl: "./app.component.html",
})
export class AppComponent {
  // 替换你的 AppId
  appId = "your_appId_at_authing_console";

  config = {
    host: "https://core.authing.cn",
  };

  onLogin([user]: [User, AuthenticationClient]): void {
    console.log(user);
  }
}
app.component.html
<guard [appId]="appId" [config]="config" (onLogin)="onLogin($event)"></guard>
如果你还有其他疑问,请直接在你的私有化服务群中联系相应的 Authing 工作人员,他们将为你提供直接支持。
¶ 12. 高级功能
除上述常用操作外,Guard 还支持一些更高级的操作(如管理用户自定义数据、退出登录、刷新 Token)。
以刷新 Token 为例:
app.component.ts
import { Component } from "@angular/core";
import { User } from "@authing/ng-ui-components";
import { AuthenticationClient } from "authing-js-sdk";

@Component({
  selector: "app-root",
  templateUrl: "./app.component.html",
})
export class AppComponent {
  // 替换你的 AppId
  appId = "your_appId_at_authing_console";

  authClient = new AuthenticationClient({
    appId: this.appId,
  });

  user: User | null = null;

  onLogin([user]: [User, any]): void {
    console.log("user", user);
    this.user = user;
  }

  onRefreshToken: () => void = async () => {
    await this.authClient.refreshToken();
    alert("刷新成功");
  };
}
app.component.html
<button (click)="onRefreshToken()">刷新用户 Token</button>
<guard [appId]="appId" (onLogin)="onLogin($event)"></guard>
¶ 附录:常用的事件及参数列表
¶ 1. 事件列表
| 名称 | 描述 | 参数 | 参数描述 |
|---|---|---|---|
| onLoad | Guard 初始化完成,开始渲染页面 | authClient | AuthenticationClient 对象,详情请查看 authing-js-sdk (opens new window) |
| onLoadError | Guard 初始化失败 | error | 错误信息 |
| onLogin | 用户登录成功 | user | 用户信息 |
| onLoginError | 用户登录失败 | error | 错误信息,包含字段缺失/非法或服务器错误等信息 |
| onRegister | 用户注册成功 | user | 用户信息 |
| onRegisterError | 用户注册失败 | error | 错误信息,包含字段缺失/非法或服务器错误等信息 |
| onClose | modal 模式中 guard 关闭事件 | - | - |
¶ 2. Config 参数列表
| 名称 | 类型 | 描述 | 默认值 |
|---|---|---|---|
| target | String | 指定 Guard 表单的挂载点,接受 querySelector (opens new window) (opens new window)能接受的所有参数或者 dom 元素,若未传入,Guard 会自动生成一个 div 标签放入 body 的最后面 | - |
| mode | GuardMode | Guard 展示模式 | GuardMode.Normal |
| title | String | 产品名称 | Authing 控制台中的配置 |
| logo | String | 产品 logo | Authing 控制台中的配置 |
| contentCss | String | 自定义 CSS 样式,如果指定了,会在 DOM 的 head 中插入一个 节点。如 body {background:#6699 !important;} | - |
| loginMethods | LoginMethods[] | 需要使用的普通登录(包括 LDAP)方式列表 | Authing 控制台中的配置 |
| registerMethods | RegisterMethods[] | 需要使用的注册方式 | Authing 控制台中的配置 |
| defaultRegisterMethod | RegisterMethods | 默认展示的注册方式 | Authing 控制台中的配置 |
| defaultScenes | GuardModuleType | 打开组件时展示的界面 | GuardModuleType.LOGIN |
| socialConnections | SocialConnections[] | 需要使用的社会化登录列表,如果在 Authing 控制台中没有配置,则不会显示 | Authing 控制台中的配置 |
| enterpriseConnections | Array | 需要使用的企业身份源列表(不包括 LDAP),列表项值为配置的企业身份源唯一标识符,注意:企业身份源需要传入对应 appId 才能使用,如果在 Authing 控制台中没有配置,则不会显示 | Authing 控制台中的配置 |
| defaultLoginMethod | String | 默认显示的登录方式。可选值为 options.loginMethods 中的某一项 | Authing 控制台中的配置 |
| autoRegister | Boolean | 是否将注册和登录合并,合并后如果用户不存在将自动注册 | Authing 控制台中的配置 |
| disableRegister | Boolean | 是否禁止注册,禁止的话会隐藏「注册」入口 | Authing 控制台中的配置 |
| disableResetPwd | Boolean | 是否禁止重置密码,禁止的话会隐藏「忘记密码」入口 | Authing 控制台中的配置 |
| clickCloseable | Boolean | Modal 模式时是否隐藏登录框右上角的关闭按钮,如果隐藏,用户将不能通过点击按钮关闭登录框 | Authing 控制台中的配置 |
| escCloseable | Boolean | Modal 模式时是否可以通过键盘 ESC 键关闭登录框 | Authing 控制台中的配置 |
| isSSO | Boolean | 是否是单点登录 | Authing 控制台中的配置 |
| lang | 'zh-CN' | 使用语言,可选值为 zh-CN、en-US | 'en-US' |
| langRange | ('zh-CN'| 'en-US')[] | 语言切换可选的范围,如果填入空数组 或 一个项时,则不会显示语言切换按钮 | ['zh-CN', 'en-US'] |
| host | String | 私自建应用的「认证地址」,如果是开启了单点登录,则应填写单点登录的「应用面板地址」 | - |
¶ GuardMode
| 键 | 值 | 说明 |
|---|---|---|
| Modal | 'modal' | 模态框模式 |
| Normal | 'normal' | 正常模式 |
¶ LoginMethods
| 键 | 值 | 说明 |
|---|---|---|
| LDAP | 'ldap' | LDAP 身份目录登录(需要配置 LDAP 服务) |
| AppQr | 'app-qrcode' | APP 扫码登录(需要接入 APP 扫码登录) |
| Password | 'password' | 账号密码登录(包括手机号 + 密码、邮箱 + 密码、用户名 + 密码。) |
| PhoneCode | 'phone-code' | 手机验证码登录 |
| WxMinQr | 'wechat-miniprogram-qrcode' | 微信 PC 小程序扫码登录 |
| AD | 'ad' | AD 用户目录登录 |
¶ RegisterMethods
| 键 | 值 | 说明 |
|---|---|---|
| 'email' | 邮箱注册 | |
| Phone | 'phone' | 手机验证码注册 |
¶ GuardModuleType
| 键 | 值 | 说明 |
|---|---|---|
| LOGIN | 'login' | 登录界面 |
| REGISTER | 'register' | 注册界面 |
¶ SocialConnections
| 键 | 值 | 说明 |
|---|---|---|
| ALIPAY | 'alipay' | 支付宝登录 |
| 'google' | 谷歌登录 | |
| WECHATPC | 'wechat:pc' | 微信 PC 登录 |
| WECHATMP | 'wechat:webpage-authorization' | 微信网页授权 |
| WECHATMOBILE | 'wechat:mobile' | 微信移动端扫码登录 |
| WECHATWORK_ADDRESS_BOOK | 'wechatwork:addressbook' | 企业微信通讯录 |
| WECHATWORK_CORP_QRCONNECT | 'wechatwork:corp:qrconnect' | 企业微信内部应用 |
| DINGTALK | 'dingtalk' | 钉钉登录 |
| 'weibo' | 微博登录 | |
| APPLE | 'apple' | Apple 登录 |
| LARK_PUBLIC | 'lark-public' | 飞书应用商店登录 |
| LARK_INTERNAL | 'lark-internal' | 飞书企业自建应用登录 |
| BAIDU | 'baidu' | 百度登录 |
| 'linkedin' | 领英登录 | |
| SLACK | 'slack' | Slack 登录 |
| YIDUN | 'yidun' | 网易易盾登录 |
| QINGCLOUD | 'qingcloud' | 青云 QingCloud 登录 |
| 'facebook' | FaceBook 登录 |